Showing posts with label linux. Show all posts

Sunday, June 13, 2010

Display Information About File - Stat

In Unix/Linux world everything is treated as files. whether it is a devices, directories and sockets — all of these are files.

Stat command displays file or file system status.

[Prabhat@Server1 Archive]$ stat 1_16470_587807474.arc
File: `1_16470_587807474.arc'
Size: 208514560 Blocks: 407664 IO Block: 4096 regular file
Device: fd02h/64770d Inode: 17006596 Links: 1
Access: (0640/-rw-r-----) Uid: ( 500/ oracle) Gid: ( 500/ dba)
Access: 2010-06-12 23:28:58.000000000 -0700
Modify: 2010-06-12 23:31:22.000000000 -0700
Change: 2010-06-12 23:31:22.000000000 -0700

Details of Linux Stat Command Output

* File: `1_16470_587807474.arc’ – Name of the file.
* Size: 208514560 – File size in bytes.
* Blocks: 407664 – Total number of blocks used by this file.
* IO Block: 4096 – IO block size for this file.
* regular file – Indicates the file type. This indicates that this is a regular file. Following are available file types.
o regular file. ( ex: all normal files ).
o directory. ( ex: directories ).
o socket. ( ex: sockets ).
o symbolic link. ( ex: symbolic links. )
o block special file ( ex: hard disk ).
o character special file. ( ex: terminal device file ).

* Device: fd02h/64770d – Device number in hex and device number in decimal
* Inode: 17006596 – Inode number is a unique number for each file which is used for the internal maintenance by the file system.
* Links: 1 – Number of links to the file
* Access: (0640/-rw-r-----): Access specifier displayed in both octal and character format. Let us see explanation about both the format.
* Uid: ( 500/oracle) – File owner’s user id and user name are displayed.
* Gid: ( 500/dba) – File owner’s group id and group name are displayed.
* Access: 2010-06-12 23:28:58.000000000 -0700 – Last access time of the file.
* Modify: 2010-06-12 23:31:22.000000000 -0700 – Last modification time of the file.
* Change: 2010-06-12 23:31:22.000000000 -0700 – Last change time of the inode data of that file.

Stat – Display Information About Directory

You can use the same command to display the information about a directory as shown below.

[Prabhat@Server1 oradata]$ stat Archive
File: `Archive'
Size: 12288 Blocks: 24 IO Block: 4096 directory
Device: fd02h/64770d Inode: 16990209 Links: 2
Access: (0755/drwxr-xr-x) Uid: ( 500/ oracle) Gid: ( 500/ dba)
Access: 2009-11-02 23:43:22.000000000 -0800
Modify: 2010-06-13 05:26:54.000000000 -0700
Change: 2010-06-13 05:26:54.000000000 -0700

Tuesday, October 27, 2009

nohup : commands keep executing even you exit from a shell prompt

nohup command if added in front of any command will continue running the command or process even if you shut down your terminal or close your session to machine

nohup command-name &

Where,

* command-name : is name of shell script or command name. You can pass argument to command or a shell script.
* & : nohup does not automatically put the command it runs in the background; you must do that explicitly, by ending the command line with an & symbol.

examples:

# nohup mysql -q -uUSER1 -pPASS1 < dump.sql > dump.log 2> error.log &


source:
http://www.idevelopment.info/data/Unix/General_UNIX/GENERAL_RunningUNIXCommandsImmunetoHangups_nohup.shtml

http://www.cyberciti.biz/tips/nohup-execute-commands-after-you-exit-from-a-shell-prompt.html

Sunday, September 13, 2009

MySQL log file rotation

Rotating MySQL Log Files on Linux.
A. Check logrotate must on daily cron
#less /etc/cron.daily/logrotate

B. Check on logrotate.d there must be mysql
#less /etc/logrotate.d/mysql
Its default Content is:

# by setting the variable "err-log"
# in the [safe_mysqld] section as follows:
#
# [safe_mysqld]
# err-log=/var/lib/mysql/mysqld.log
#
# If the root user has a password you have to create a
# /root/.my.cnf configuration file with the following
# content:
#
# [mysqladmin]
# password =
# user= root
#
# where "" is the password.
#
# ATTENTION: This /root/.my.cnf should be readable ONLY
# for root !

/var/lib/mysql/mysqld.log {
# create 600 mysql mysql
notifempty
daily
rotate 3
missingok
compress
postrotate
# just if mysqld is really running
if test -x /usr/bin/mysqladmin && \
/usr/bin/mysqladmin ping &>/dev/null
then
/usr/bin/mysqladmin flush-logs
fi
endscript
}

Read uses of variable
My file :

# This logname can be set in /etc/my.cnf
# by setting the variable "err-log"
# in the [safe_mysqld] section as follows:
#
# [safe_mysqld]
# err-log=/var/lib/mysql/mysqld.log
#
# If the root user has a password you have to create a
# /root/.my.cnf configuration file with the following
# content:
#
# [mysqladmin]
# password =
# user= root
#
# where "" is the password.
#
# ATTENTION: This /root/.my.cnf should be readable ONLY
# for root !

# - I put everything in one block and added sharedscripts, so that mysql gets
# flush-logs'd only once.
# Else the binary logs would automatically increase by n times every day.
# - The error log is obsolete, messages go to syslog now.
/var/log/mysql/mysql.log /var/log/mysql/mysql-slow.log {
daily
rotate 7
missingok
create 640 mysql adm
compress
sharedscripts
postrotate
test -x /usr/bin/mysqladmin || exit 0

# If this fails, check debian.conf!
export HOME=/etc/mysql/my.cnf
MYADMIN="/usr/bin/mysqladmin --defaults-file=/etc/mysql/debian.cnf"
if [ -z "`$MYADMIN ping 2>/dev/null`" ]; then
# Really no mysqld or rather a missing debian-sys-maint user?
# If this occurs and is not a error please report a bug.
if ps cax | grep -q mysqld; then
exit 1
fi
else
$MYADMIN flush-logs
fi
endscript


C. Create a file /root/.my.cnf.
#vi /root/.my.cnf (# ATTENTION: This /root/.my.cnf should be readable ONLY)

Its contain ;
[mysqladmin]
password = xxxx
user= root


Run manually ;

#logrotate -f /path/to/some/logrotate.conf
if you want to force a rotatation which is uncalled for in the config files, you need to give it a "-f":

Wednesday, September 09, 2009

MySQL: Analyze slow query log using mysqldumpslow

First enable slow query logging, then generate a slow query and finally look at the slow query log.

mysqldumpslow
This program parses and summarizes a 'slow query log'.
-v verbose
-d debug
-s=WORD
what to sort by (t, at, l, al, r, ar etc)
-r reverse the sort order (largest last instead of first)
-t=NUMBER
just show the top n queries
-a don't abstract all numbers to N and strings to 'S'
-n=NUMBER
abstract numbers with at least n digits within names
-g=WORD
grep: only consider stmts that include this string
-h=WORD
hostname of db server for *-slow.log filename (can be wildcard)
-i=WORD
name of server instance (if using mysql.server startup script)
-l don't subtract lock time from total time
eg.

1. mysqldumpslow -t 10 /var/lib/mysql/mysql-slow.log.1 > /tmp/top_ten_slow_query.txt
It will put top ten slow query in file /tmp/top_ten_slow_query.txt
2. mysqldumpslow -a -s c -t 10 /var/lib/mysql/mysql-slow.log.1 > /tmp/top_ten_repeat_slow_query.txt
It will put top ten repeat slow query in file top_ten_repeat_slow_query.txt

Thursday, July 30, 2009

AWK: Pattern Matching and Processing

awk 'pattern {action}' filename

Reads one line at a time from file, checks for pattern match, performs action if pattern matched pattern.

NR is a special awk variable meaning the line number of the current record

can use a line number, to select a specific line, by comparing it to NR (for example: NR == 2)
can specify a range of line numbers (for example: NR == 2, NR == 4)

can specify a regular expression, to select all lines that match

$n are special awk variables, meaning the value of the nth field (field delimiter is space or tab)

$0 is the entire record
can use field values, by comparing to $n (for example: $3 == 65)

every line is selected if no pattern is specified

Instructions

print - print line(s) that match the pattern, or print fields within matching lines
print is default if no action is specified
there are many, many instruction, including just about all C statements with similar syntax
other instructions will be covered in future courses


examples, using the file testfile.

awk 'NR == 2, NR == 4' testfile - print the 2nd through 4th lines (default action is to print entire line)

awk '/chevy/' testfile - print only lines matching regular expression, same as grep 'chevy' testfile
awk '{print $3, $1}' testfile - print third and first field of all lines (default pattern matches all lines)

awk '/chevy/ {print $3, $1}' testfile - print third and first fiield of lines matching regular expression
awk '$3 == 65' testfile - print only lines with a third field value of 65
awk '$5 < = 3000' testfile - print only lines with a fifth field value that is less than or equal to 3000

awk '{print $1}' testfile - print first field of every record
awk '{print $3 $1}' testfile
awk '{print $3, $1}' testfile - inserts output field separator (variable OFS, default is space)

awk -F, '{print $2}' testfile - specifies that , is input field separator, default is space or tab
awk '$2 ~ /[0-9]/ {print $3, $1}' testfile - searches for reg-exp (a digit) only in the second field

awk '{printf "%-30s%20s\n", $3, $2}' testfile - print 3rd field left-justified in a 30 character field, 2nd field right-justified in a 20 character field, then skip to a new line (required with printf)


awk '$3 <= 23' testfile - prints lines where 3rd field has a value <= 23
awk '$3 <='$var1' {print $3}' testfile - $var1 is a shell variable, not an awk variable, e.g. first execute: var1=23

awk '$3<='$2' {$3++} {print $0}' testfile - if field 3 <= argument 2 then increment field 3, e.g. first execute: set xxx 23


awk '$3> 1 && $3 < 23' testfile - prints lines where 3rd field is in range 1 to 23

awk '$3 < 2 || $3 > 4' testfile - prints lines where 3rd field is outside of range 2 to 4
awk '$3 < "4"' testfile - double quotes force string comparison
NF is an awk variable meaning # of fields in current record

awk '! (NF == 4)' testfile - lines without 4 fields
NR is an awk variable meaning # of current record
awk 'NR == 2,NR==7' testfile - range of records from record number 2 to 7

BEGIN is an awk pattern meaning "before first record processed"
awk 'BEGIN {OFS="~"} {print $1, $2}' testfile - print 1st and 2nd field of each record, separated by ~
END is an awk pattern meaning "after last record processed"

awk '{var+=$3} END {print var}' testfile - sum of 3rd fields in all records
awk '{var+=$3} END {print var/NR}' testfile - average of 3rd fields in all records - note that awk handles decimal arithmetic


awk '$5 > var {var=$5} END {print var}' testfile - maximum of 5th fields in all records

sort -rk5 testfile | awk 'NR==1 {var=$5} var==$5 {print $0}' - print all records with maximum 5th field

Simple awk operations involving functions within the command line:


awk '/chevy/' testfile

# Match lines (records) that contain the keyword chevy note that chevy is a regular expression...

awk '{print $3, $1}' testfile

# Pattern not specified - therefore, all lines (records) for fields 3 and 1 are displayed

# Note that comma (,) between fields represents delimiter (ie. space)

awk '/chevy/ {print $3, $1}' testfile

# Similar to above, but for chevy

awk '/^h/' testfile


# Match testfile that begin with h

awk '$1 ~ /^h/' testfile ### useful ###

# Match with field #1 that begins with h

awk '$1 ~ /h/' testfile


# Match with field #1 any epression containing the letter h

awk '$2 ~ /^[tm]/ {print $3, $2, "$" $5}' testfile

# Match testfile that begin with t or m and display field 3 (year), field 2 (model name) and then $ followed by field 4 (price)

--------------------------------------------------------------------------------------------------

Complex awk operations involving functions within the command line:


awk ?/chevy/ {print $3, $1}? testfile

# prints 3rd & 1st fields of record containing chevy

awk ?$1 ~ /^c/ {print $2, $3}? testfile

# print 2nd & 3rd fields of record with 1st field beginning with c

awk ?NR==2 {print $1, $4}? testfile

# prints 1st & 4th fields of record for record #2

awk ?NR==2, NR==8 {print $2, $3}? testfile

# prints 2nd & 3rd fields of record for records 2 through 8

awk ?$3 >= 65 {print $3, $1}? testfile

# prints 3rd & 1st fields of record with 3rd field >= 65

awk ?$5 >= ?2000? && $5 < ?9000? {print $2, $3}? testfile

# prints 2nd & 3rd fields of record within range of 2000 to under 9000

Thursday, July 02, 2009

MYSQL: slow queries log

MySQL has built-in functionality that allows you to log SQL queries to a file , You can enable the full SQL queries logs to a file or only slow running queries log. It is easy for us to troubleshoot/ debug the sql statement if SQL queries log enable , The slow query log is used to find queries that take a long time to execute and are therefore candidates for optimization.

To enable you just need to add some lines to your my.cnf file, and restart. Add the following:

* To enable slow Query Log only

log-slow-queries = /var/log/mysql/mysql-slow.log
long_query_time = 1


After enabling slow query, mysqld writes a statement to the slow query log file and it consists of all SQL statements that took more than long_query_time seconds to execute. The time to acquire the initial table locks is not counted as execution time. mysqld only log after SQL statements has been executed and after all locks have been released, so log order might be different from execution order. The minimum and default values of long_query_time are 1 and 10, respectively.

* To enable full Log Query

log=/var/log/mysqldquery.log

The above will log all queries to the log file.

Selecting Queries to Optmize
• The slow query log
– Logs all queries that take longer than long_query_time
– Can also log all querie s that don’t use indexes with
--log-queries-not-using-indexes
– To log slow administatve commands use
--log-slow-admin-statements
– To analyze the contents of the slow log use
mysqldumpslow

Friday, April 17, 2009

Block IP addresses using IPtables

Block a particular
#service iptables start
#iptables -I INPUT -s 10.1.24.4 -j DROP

This command will simply drop any packet coming from the address 10.1.24.4

To list the chains:
#iptables -L -n

To make persist :

#service iptables status
#iptables-save (copy output)
#emacs /etc/sysconfig/iptables (paste output)
#service iptables restart

make sure iptables service start on default.

Tuesday, March 24, 2009

Boot time parameters of Linux kernel

Boot time parameters you should know about the Linux kernel.

The Linux kernel accepts boot time parameters as it starts to boot system. This is used to inform kernel about various hardware parameter.

The kernel command line syntax
name=value1,value2,value3…
Where,
* name : Keyword name, for example, init, ro, boot etc

Common Boot time parameters
init
This sets the initial command to be executed by the kernel. Default is to use /sbin/init, which is the parent of all processes.
To boot system without password pass /bin/bash or /bin/sh as argument to init
init=/bin/bash

single
The most common argument that is passed to the init process is the word 'single' which instructs init to boot the computer in single user mode, and not launch all the usual daemons

root=/dev/device
This argument tells the kernel what device (hard disk, floppy disk) to be used as the root filesystem while booting. For example following boot parameter use /dev/sda1 as the root file system:
root=/dev/sda1
If you copy entire partition from /dev/sda1 to /dev/sdb1 then use
root=/dev/sdb1

ro
This argument tells the kernel to mount root file system as read-only. This is done so that fsck program can check and repair a Linux file system. Please note that you should never ever run fsck on read/write file system.

rw
This argument tells the kernel to mount root file system as read and write mode.

panic=SECOND
Specify kernel behavior on panic. By default, the kernel will not reboot after a panic, but this option will cause a kernel reboot after N seconds. For example following boot parameter will force to reboot Linux after 10 seconds
panic=10

maxcpus=NUMBER
Specify maximum number of processors that an SMP kernel should make use of. For example if you have four cpus and would like to use 2 CPU then pass 2 as a number to maxcpus (useful to test different software performances and configurations).
maxcpus=2

debug
Enable kernel debugging. This option is useful for kernel hackers and developers who wish to troubleshoot problem

selinux [0|1]
Disable or enable SELinux at boot time.
• Value 0 : Disable selinux
• Value 1 : Enable selinux

raid=/dev/mdN
This argument tells kernel howto assembly of RAID arrays at boot time. Please note that When md is compiled into the kernel (not as module), partitions of type 0xfd are scanned and automatically assembled into RAID arrays. This autodetection may be suppressed with the kernel parameter "raid=noautodetect". As of kernel 2.6.9, only drives with a type 0 superblock can be autodetected and run at boot time.

mem=MEMEORY_SIZE
This is a classic parameter. Force usage of a specific amount of memory to be used when the kernel is not able to see the whole system memory or for test. For example:
mem=1024M
The kernel command line is a null-terminated string currently up to 255 characters long, plus the final null. A string that is too long will be automatically truncated by the kernel, a boot loader may allow a longer command line to be passed to permit future kernels to extend this limit (H. Peter Anvin ).
Other parameters
initrd /boot/initrd.img
An initrd should be loaded. the boot process will load the kernel and an initial ramdisk; then the kernel converts initrd into a "normal" ramdisk, which is mounted read-write as root device; then /linuxrc is executed; afterwards the "real" root file system is mounted, and the initrd file system is moved over to /initrd; finally the usual boot sequence (e.g. invocation of /sbin/init) is performed. initrd is used to provide/load additional modules (device driver). For example, SCSI or RAID device driver loaded using initrd.

hdX =noprobe
Do not probe for hdX drive. For example, disable hdb hard disk:
hdb=noprobe
If you disable hdb in BIOS, Linux will still detect it. This is the only way to disable hdb.

ether=irq,iobase,[ARG1,ARG2],name
Where,
• ether: ETHERNET DEVICES
For example, following boot argument force probing for a second Ethernet card (NIC), as the default is to only probe for one (irq=0,iobase=0 means automatically detect them).
ether=0,0,eth1

How to begin the enter parameters mode?
You need to enter all this parameter at Grub or Lilo boot prompt. For example if you are using Grub as a boot loader, at Grub prompt press 'e' to edit command before booting.
1) Select second line
2) Again, press 'e' to edit selected command
3) Type any of above parameters.
See an example of "recovering grub boot loader password", for more information. Another option is to type above parameters in grub.conf or lilo.conf file itself.

More detail

Thursday, July 10, 2008

Swap Filesystem Creation

Partition Creation for Swap filesystem
1. fdisk -l
2. fdisk /dev/sda
3. Type p & Press Enter
4. Type n & Press Enter
5. Just Press Enter for 1st Cylinder size
6. Type +sizeM for last Cylinder size
7. Type p & Press Enter
8. Type t & Press Enter
9. t2 /dev/sda12
10. Type 82 & Press Enter
11. Type p & Press Enter
12. Type w & Press Enter
13. partprobe
14. swapon -s
15. swapoff /dev/sda7 => Swapoff the another swap partition
16. swapon -s

Creation of a new Swap Filesystem
1. mkswap -v1 /dev/sda12
2. swapon /dev/sda12
3. swapon /dev/sda7
Here /dev/sda7 & /dev/sda12 are swap partition.

For automounting the either or swap partition do the following :

1. vi /etc/fstab
2. Add the following line :-

/dev/sda12 swap swap defaults 0 0

Note :- Partition Id identifies what type of filesystem will have to create. Id is Hexacode number. Maximum 4 partition can be create 3 primary & 1 Extended.

Filesystem ID
Ext2 / Ext3 ( Linux) 83
Swap 82
Fat32 C

Linux partition using fdisk

Linux partition using fdisk

1. fdisk -l => To check what type of Hard Disk i.e. Sata ( /dev/sda ) or Pata ( /dev/hda )
2. fdisk /dev/sda
3. Type n then Enter => For new Partition
4. Just press Enter => For 1st Cylinder
5. Type +size and press Enter => For Last Cylinder for Example +1000M. Size can be in terms of M or K
6. Type p => To print the partition
7. Type w => To save the new partition. It's save in the hard disk but kernel partition table not updated. (/dev/sda11 is created in my system , might be different in your system)
8. Type partprobe & Press Enter => To update the kernel.
9. mkfs.ext3 -b 2048 /dev/sda11 => Here b is the block & is \block size in bytes & /dev/sda11 is new partition has created
11. e2label /dev/sda11 data=> data is Label name
12. e2label /dev/sda11
13. mkdir /data => To mount the partition /dev/sda11 /data is a directory
14. mount /dev/sda11 /data
15. ls /data
To make this above mount point for /dev/sda11 permanent write entry in the /etc/fstab file by the following way :-

1.vi /etc/fstab
2. LABEL=data /data ext3 defaults 0 0

=> defaults means how will it be mount by which criteria rw,exec,acl etc. First 0 is for dump value i.e. Whether there will be automatic dumping or not means or off. Next 0 is fsck sequence value i.e. If there is any improperly shutdown occurs then the system again then which file it will check for consistency.0 means it doesn't check.

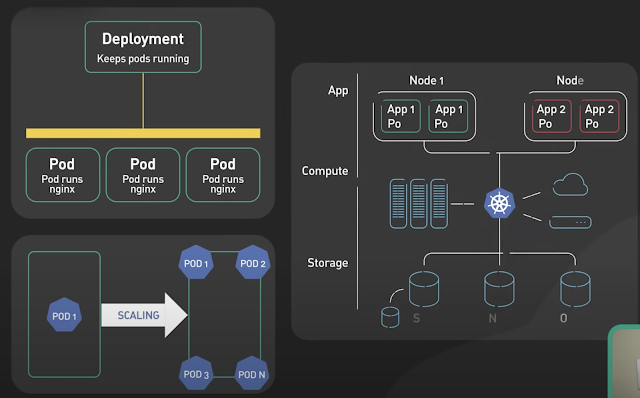
Basics of Kubernetes

 Kubernetes, often abbreviated as K8s , is an open-source platform designed to automate the deployment, scaling, and management of container...