The RPM packages usages and details:
Ø MySQL-server-VERSION.glibc23.i386.rpm - The MySQL server. You need this unless you only want to connect to a MySQL server running on another machine.
Ø MySQL-client-VERSION.glibc23.i386.rpm - The standard MySQL client programs. You probably always want to install this package.
Ø MySQL-devel-VERSION.glibc23.i386.rpm - The libraries and include files that are needed if you want to compile other MySQL clients, such as the Perl modules.
Ø MySQL-debuginfo-VERSION.glibc23.i386.rpm - This package contains debugging information. debuginfo RPMs are never needed to use MySQL software; this is true both for the server and for client programs. However, they contain additional information that might be needed by a debugger to analyze a crash.
Ø MySQL-shared-VERSION.glibc23.i386.rpm - This package contains the shared libraries (libmysqlclient.so*) that certain languages and applications need to dynamically load and use MySQL. It contains single-threaded and thread-safe libraries. If you install this package, do not install the MySQL-shared-compat package.
Ø MySQL-shared-compat-VERSION.glibc23.i386.rpm - This package includes the shared libraries for MySQL 3.23, 4.0, and so on, up to the current release. It contains single-threaded and thread-safe libraries. Install this package instead of MySQL-shared if you have applications installed that are dynamically linked against older versions of MySQL but you want to upgrade to the current version without breaking the library dependencies.
Ø MySQL-shared-compat-advanced-gpl-VERSION.glibc23.i386.rpm, MySQL-shared-compat-advanced-VERSION.glibc23.i386.rpm - These are like the MySQL-shared-compat package, but are for the “MySQL Enterprise Server – Advanced Edition” products. Install these packages rather than the normal MySQL-shared-compat package if you want to included shared client libraries for older MySQL versions.
Ø MySQL-embedded-VERSION.glibc23.i386.rpm - The embedded MySQL server library.
Ø MySQL-ndb-management-VERSION.glibc23.i386.rpm, MySQL-ndb-storage-VERSION.glibc23.i386.rpm, MySQL-ndb-tools-VERSION.glibc23.i386.rpm, MySQL-ndb-extra-VERSION.glibc23.i386.rpm - Packages that contain additional files for MySQL Cluster installations.
o Note : The MySQL-ndb-tools RPM requires a working installation of perl. Prior to MySQL 5.1.18, the DBI and HTML::Template packages were also required. See Section 2.15, “Perl Installation Notes”, and Section 17.4.21, “ndb_size.pl — NDBCLUSTER Size Requirement Estimator”, for more information.
Ø MySQL-test-VERSION.glibc23.i386.rpm - This package includes the MySQL test suite.
Ø MySQL-VERSION.src.rpm - This contains the source code for all of the previous packages. It can also be used to rebuild the RPMs on other architectures (for example, Alpha or SPARC).
Default Installation Directory :
Directory -> Contents of Directory
/usr/bin -> Client programs and scripts
/usr/sbin -> The mysqld server
/var/lib/mysql -> Log files, databases
/usr/share/info -> Manual in Info format
/usr/share/man -> Unix manual pages
/usr/include/mysql -> Include (header) files
/usr/lib/mysql -> Libraries
/usr/share/mysql -> Miscellaneous support files, including error messages, character set files, sample configuration files, SQL for database installation
/usr/share/sql-bench -> Benchmarks
Showing posts with label Install linux. Show all posts
Showing posts with label Install linux. Show all posts
Monday, September 13, 2010


Monday, March 30, 2009
creating bulk users in linux
Today I have configured NX server.
Now, Next task is to create users and really its very time consuming and boring task.
Usually you use useradd command to create a new user or update default new user information from command line.
So i have explore Linux and searched on Google , I have found few scripts to do this. But later I have found one good and easy solution.
Here is that,
Update and create new users in bulk.
newusers command reads a file of user name and clear-text password pairs and uses this information to update a group of existing users or to create new users. Each line is in the same format as the standard password file.
This command is intended to be used in a large system environment where many accounts are updated at a single time (batch mode). Since username and passwords are stored in clear text format make sure only root can read/write the file. Use chmod command:
# touch /root/bulk-user-add.txt
# chmod 0600 /root/bulk-user-add.txt
Create a user list as follows. Open file:
# emacs /root/bulk-user-add.txt
Append username and password:
sanjay:mypass99:555:555:Sanjay Singh:/home/Sanjay:/bin/bash
frampton:mypass99n:556:556:Frampton Martin:/home/Frampton:/bin/bash
----
--
---
barun:mypass99:560:560:Barun Ghosh:/home/Barun:/bin/bash
Now create users in batch:
# newusers /root/bulk-user-add.txt
Read man page of newusers for more information.
May be I will automate entire procedure using a php
Now, Next task is to create users and really its very time consuming and boring task.
Usually you use useradd command to create a new user or update default new user information from command line.
So i have explore Linux and searched on Google , I have found few scripts to do this. But later I have found one good and easy solution.
Here is that,
Update and create new users in bulk.
newusers command reads a file of user name and clear-text password pairs and uses this information to update a group of existing users or to create new users. Each line is in the same format as the standard password file.
This command is intended to be used in a large system environment where many accounts are updated at a single time (batch mode). Since username and passwords are stored in clear text format make sure only root can read/write the file. Use chmod command:
# touch /root/bulk-user-add.txt
# chmod 0600 /root/bulk-user-add.txt
Create a user list as follows. Open file:
# emacs /root/bulk-user-add.txt
Append username and password:
sanjay:mypass99:555:555:Sanjay Singh:/home/Sanjay:/bin/bash
frampton:mypass99n:556:556:Frampton Martin:/home/Frampton:/bin/bash
----
--
---
barun:mypass99:560:560:Barun Ghosh:/home/Barun:/bin/bash
Now create users in batch:
# newusers /root/bulk-user-add.txt
Read man page of newusers for more information.
May be I will automate entire procedure using a php
Wednesday, July 16, 2008
Creating RAID Partition
Creating RAID-5
#less /proc/mdstat
#mdadm --detail /dev/md0
#mdadm /dev/md0 -r /dev/sdb0
Friday, May 02, 2008
instant Messenger: Openfire, Spark & web chat (Fastpath)
-> Openfire
1 . lynx http://www.igniterealtime.org/downloads/download-landing.jsp?file=openfire/openfire-3.4.5-1.i386.rpm
2 . rpm -ivh openfire-3.4.5-1.i386.rpm
3 . /etc/rc.d/init.d/openfire status
4 . /etc/rc.d/init.d/openfire start
5. Make sure that the firewall is stopped.
6 . http://www.grmtech.com:9090/
7 . From the plugin tab in the web based admin control panel: installed Asterisk-IM Openfire
-> Spark
Download and install on client system.
http://www.igniterealtime.org/downloadServlet?filename=spark/spark_2_5_8.exe
-> web chat
Go to plugin tab in the web based admin control panel:
1.Click on 'Available Plugins'
2. Install the following plugin
a. Spark Fastpath Webchat
b. Fastpath Service
c. Monitoring Service (its is a optional)
1 . lynx http://www.igniterealtime.org/downloads/download-landing.jsp?file=openfire/openfire-3.4.5-1.i386.rpm
2 . rpm -ivh openfire-3.4.5-1.i386.rpm
3 . /etc/rc.d/init.d/openfire status
4 . /etc/rc.d/init.d/openfire start
5. Make sure that the firewall is stopped.
6 . http://www.grmtech.com:9090/
7 . From the plugin tab in the web based admin control panel: installed Asterisk-IM Openfire
-> Spark
Download and install on client system.
http://www.igniterealtime.org/downloadServlet?filename=spark/spark_2_5_8.exe
-> web chat
Go to plugin tab in the web based admin control panel:
1.Click on 'Available Plugins'
2. Install the following plugin
a. Spark Fastpath Webchat
b. Fastpath Service
c. Monitoring Service (its is a optional)
How to make a linux server act as a gateway
1. turned on IP forwarding in sysctl.conf by setting the value to 1
2. gave the ip tables command for nat masquerade.
iptables -t nat -A POSTROUTING -o eth0 -j MASQUERADE
iptables -t nat -A POSTROUTING -o eth1 -j MASQUERADE
Checked that the commands took effect by:
iptables-save
and then made the entries from iptables-save inside the file /etc/sysconfig/iptables
2. gave the ip tables command for nat masquerade.
iptables -t nat -A POSTROUTING -o eth0 -j MASQUERADE
iptables -t nat -A POSTROUTING -o eth1 -j MASQUERADE
Checked that the commands took effect by:
iptables-save
and then made the entries from iptables-save inside the file /etc/sysconfig/iptables
Wednesday, October 24, 2007
Install GNU/Linux without any CD, floppy, USB-key, nor any other removable media
Install GNU/Linux without any CD, floppy, USB-key, nor any other removable media
I have a server running CentOS 4 with internet on it. This server is without any CD Drive, floppy Drive, USB-key, nor any other removable media and its Remote server.
How do i install CentOS 5 on it? I have searched in various forums, posted in various forums.
After a long hour I have came to solution.
I am writting here what excataly I have done.
Since, I have net connection on current system,
1. I have downloaded ISO image of centos 5 (1 CD only)
2. mkdir /mnt/tmp
3. mount -o loop CentOS-5.0-x86_64-bin-1of7.iso /mnt/tmp
4. cp -a /mnt/tmp/isolinux/vmlinuz /boot/vmlinuzMy
5. cp -a /mnt/tmp/isolinux/initrd.img /boot/initrdMy.img
6. umount /mnt/tmp
7. Add entry to your /etc/grub.conf
title Fedora Core 2 Installation
root (hd0,0) kernel /boot/vmlinuzMy
initrd /boot/initrdMy.img
8. Reboot system
9. Now your is booted and ready for new installation.
10. Select installation method you want (FTP, HTTP or NFS probably). I have selected http
11. Give your Name server and ipdetails.
12. Give site & Dir (I have given)
mirror.stanford.edu
/yum/pub/centos/5/os/x86_64/
I think its ok to install now :)
I have a server running CentOS 4 with internet on it. This server is without any CD Drive, floppy Drive, USB-key, nor any other removable media and its Remote server.
How do i install CentOS 5 on it? I have searched in various forums, posted in various forums.
After a long hour I have came to solution.
I am writting here what excataly I have done.
Since, I have net connection on current system,
1. I have downloaded ISO image of centos 5 (1 CD only)
2. mkdir /mnt/tmp
3. mount -o loop CentOS-5.0-x86_64-bin-1of7.iso /mnt/tmp
4. cp -a /mnt/tmp/isolinux/vmlinuz /boot/vmlinuzMy
5. cp -a /mnt/tmp/isolinux/initrd.img /boot/initrdMy.img
6. umount /mnt/tmp
7. Add entry to your /etc/grub.conf
title Fedora Core 2 Installation
root (hd0,0) kernel /boot/vmlinuzMy
initrd /boot/initrdMy.img
8. Reboot system
9. Now your is booted and ready for new installation.
10. Select installation method you want (FTP, HTTP or NFS probably). I have selected http
11. Give your Name server and ipdetails.
12. Give site & Dir (I have given)
mirror.stanford.edu
/yum/pub/centos/5/os/x86_64/
I think its ok to install now :)
Subscribe to:
Posts (Atom)
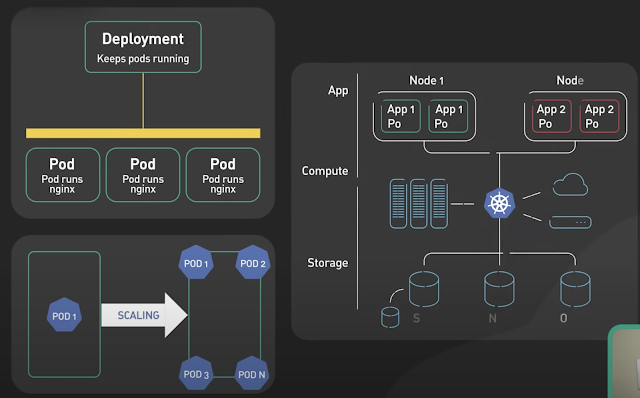
Basics of Kubernetes
Kubernetes, often abbreviated as K8s , is an open-source platform designed to automate the deployment, scaling, and management of container...
-
The Unix top command is designed to help users determine which processes are running and which applications are using more memory or process...
-
Rotating MySQL Log Files on Linux. A. Check logrotate must on daily cron #less /etc/cron.daily/logrotate B. Check on logrotate.d there must ...
-
Security Issues with MySQL ROOT Access MySQL offers simple but very effective security mechanisms. Unfortunately, the default installation o...
