Thursday, November 20, 2008

move you bookmarks between computers

Most of time I face problem when I lose my bookmarks. Its important to take backup of bookmarks which easily transfer between systems. After doning 10min of search I comeup with 3 method.
a. Export & Import Method.
  • From the Firefox browser, click on on the "Bookmarks" menu located at the top of the window. Next, click on the "Organize Bookmarks"
  • This brings you to a separate window which lists all existing bookmarks (favorite websites). From the File menu at the top, you have the option to Import and Export.
  • If you need to import external bookmarks and merge them into Firefox, do so by clicking "Import" from the File menu. This allows you to import your favorites from Internet Explorer, or just an existing file you had saved in the past. Choose the desired option, and hit "Next" to search for your bookmarks. When done, click "Finish."
  • If you need to externally save existing Firefox bookmarks, click on the "Export" option from the File menu. Once you choose a save destination, you're all set.

b. Keep your bookmark online, few sites gives service to keep the bookmarks online and it will sync data between your firefok and there server. Just you need to create account there one of such site is http://www.mybookmarks.com/.

c. This will take backup of all your Firefox Extentions along with bookmarks. What you need to do install FEBE (Firefox Environment Backup Extension). There is another extension CLEO(Compact Library Extension Organizer) that can be used to combine all the extension and make it as a single extension file. it can also be very help full if you have your own custom made extension.

source :

http://mozilla.gunnars.net/firefox_bookmarks_tutorial.html

http://prabhanjan-panigrahi.blogspot.com/2008/11/backup-your-firefox-extentions-and.html
Thursday, September 25, 2008

Performance : Alternative PHP Cache (APC)

1. yum install php-pecl-apc

If for some reason centosplus repo is not enabled then:
1. cd /usr/src/
2. wget http://pecl.php.net/get/APC-3.0.19.tgz
3. tar xvzf APC-3.0.19.tgz
4. cd APC-3.0.19
5. yum install php-devel
6. yum install automake
7. yum install libtool httpd-devel*
8. /usr/bin/phpize
9. ./configure --enable-apc --enable-apc-mmap --with-apxs --with-php-config=/usr/bin/php-config
10. make
11. make install
12. ls /usr/lib64/php4/ or /usr/lib64/php/modules/
13 #emacs /etc/php.ini
extension=apc.so
apc.enabled=1
apc.shm_segments=1
apc.shm_size=128
apc.ttl=7200
apc.user_ttl=7200
apc.num_files_hint=1024
apc.mmap_file_mask=/tmp/apc.XXXXXX
apc.enable_cli=1

Monday, September 15, 2008

Understanding LVM

LVM terminology:
a. Physical Volume (PV) : A PV is nothing more than a physical medium with some administrative data added to it - once you have added this, LVM will recognise it .
b. Physical Extents (PE) :- Physical Extents are like really big blocks, often with a size of megabytes.
c. Volume Group (VG) - A VG is made up of a number of Physical Extents (which may have come from multiple Physical Volumes or hard drives). While it may be tempting to think of a VG as being made up of several hard drives (/dev/hda and /dev/sda for example), it's more accurate to say that it contains PEs which are provided by these hard drives.
d. Logical Volumes (LV) - A logical volume functions like a normal partition -- it have a filesystem such as Ext3, and a mount point. From , Volume Group, PEs can be assigned to a logical Volume (LV).

Creating Physical volumes:
#pvcreate /dev/sda3

Multiple physical volumes
#pvcreate /dev/sda9 /dev/sda10


Creating a volume group:
#vgcreate home2 /dev/sda3

Multiple physical volumes to make up a volume group
#vgcreate home3 /dev/sda9 /dev/sda10

Creating logical volume:
#lvcreate --size 1G -n downloads home2
now,
#mkfs.ext3 /dev/home2/downloads
#mkdir /home/downloads
#mount -t ext3 /dev/home2/downloads /home/downloads
Add a line to the /etc/fstab file
/dev/home2/downloads /home/downloads ext3 defaults 1 2

Resizing logical volumes:
#umount /home/downloads
#lvextend -L +1G /dev/home2/downloads
#resize2fs /dev/home2/downloads

Similar to the lvextend there is the lvreduce command:
#lvreduce -L -500M /dev/home2/downloads
#resize2fs /dev/home2/downloads

Modifying volume groups:
a. unmount the logical volumes within your volume group.
b. #vgextend home2 /dev/sda5 /dev/sda7
(The volume group home2 is now made up of sda3, sda5, and sda7)

Remove a volume group
a. Unmount your logical volume
b. #vgremove home2

A Physical Volume, containing Physical Extents:

+-----[ Physical Volume ]------+
| PE | PE | PE | PE | PE | PE |
+------------------------------+

A Volume Group, containing 2 Physical Volumes (PVs) with 6 Physical Extents:

+------[ Volume Group ]-----------------+
| +--[PV]--------+ +--[PV]---------+ |
| | PE | PE | PE | | PE | PE | PE | |
| +--------------+ +---------------+ |
+---------------------------------------+

We now further expand this:

+------[ Volume Group ]-----------------+
| +--[PV]--------+ +--[PV]---------+ |
| | PE | PE | PE | | PE | PE | PE | |
| +--+---+---+---+ +-+----+----+---+ |
| | | | +-----/ | | |
| | | | | | | |
| +-+---+---+-+ +----+----+--+ |
| | Logical | | Logical | |
| | Volume | | Volume | |
| | | | | |
| | /home | | /var | |
| +-----------+ +------------+ |
+---------------------------------------+


You can use the lvdisplay command see logical vloume's status.

http://www.ibm.com/developerworks/library/l-lvm2/index.html

http://www.linux.com/feature/11864

Roaming Profile on samba with PDC controller, windows as client

1. Make these change in samba configuration file : emacs /etc/samba/smb.conf
Important terms to understand
a. wins support = yes
b. domain master = yes
c. netbios name = samba
d. workgroup = OFFICE
e. domain logons = yes

2. Samba root access
#smbpasswd -a

3. Add new user :
#useradd prabhat (adding linux user)
#passwd prabhat
#smbpasswd -a prabhat (converting linux user into samba user)

4. On the windows machine,Aadd window machine in 'OFFICE' domain of samba.
On desktop, Right click on "My Computer" -> "properties" -> "Network identificatation" tab -> "change"
while joing it will ask for username password "root" & "OFFICE" (see serial no 2.)


Important Points:
1. There will be one and only one PDC over network.
2. The machine name must be unique over network.
3. While login from client domain name must be 'OFFICE'


#emacs /etc/samba/smb.conf
[global]
log file = /var/log/samba/%m.log
log level = 2
load printers = yes
idmap gid = 16777216-33554431
socket options = TCP_NODELAY SO_RCVBUF=8192 SO_SNDBUF=8192
winbind use default domain = no
template shell = /bin/false
wins support = yes
dns proxy = no
netbios name = samba
domain master = yes
preferred master = yes
cups options = raw
server string = Samba PDC
idmap uid = 16777216-33554431
workgroup = OFFICE
os level = 64
domain logons = yes
add user script = /usr/sbin/useradd -m '%u'
delete user script = /usr/sbin/userdel -r '%u'
add group script = /usr/sbin/groupadd '%g'
delete group script = /usr/sbin/groupdel '%g'
add user to group script = /usr/sbin/usermod -G '%g' '%u'
set primary group script = /usr/sbin/usermod -g '%g' '%u'
add machine script = /usr/sbin/useradd -s /bin/false -d /dev/null '%u'
logon script = scripts\logon.bat
passdb backend = tdbsam
printcap name = /etc/printcap
security = user
max log size = 50
hosts allow = 10.1.

[homes]
comment = Home Directories
valid users = %S
browseable = No
writable = Yes

# Un-comment the following and create the netlogon directory for Domain Logons
[netlogon]
comment = Network Logon Service
logon path = \\%L\profiles\%U
logon home = \\%L\%U\.9xprofile
logon drive = p:
browseable = no
writable = no
; share modes = no


Concept:
http://searchenterpriselinux.techtarget.com/tip/0,289483,sid39_gci1151921,00.html
Practial Implement:
http://searchenterpriselinux.techtarget.com/tip/0,289483,sid39_gci1151926,00.html
Read section : "Joining" a Samba Domain
http://www.rmschneider.com/writing/xp_and_samba.html

Wednesday, July 23, 2008

NFS server Redhat 5

Making NFS server Live:

Server side (Server IP 10.1.31.1):
1. Check nfs-utils is installed or not using
#yum list nfs-utils
2. Edit /etc/exports , add dir you want share with netrwork information and permision
# vi /etc/exports
/var/ftp/pub 10.1.0.0/16(rw,sync,no_root_squash)
3. Restart nfs service
# service nfs retstart
or
# service nfs reload
4. Check port & shared dir using
# rcpinfo -p
# export -v
# service portmap status

Client Side (Client IP : 10.1.0.0/16, eg 10.1.31.67):
1. mount shared nfs folder
# mount 10.1.31.3:/var/ftp/pub /mnt
2. Do static mount using /etc/fstab

# vi /etc/fstab
10.1.31.1:/var/ftp/pub /mnt nfs defaults 0 0

Wednesday, July 16, 2008

Creating RAID Partition

Creating RAID-5

For this you need 3 Partition, 2 partitions with same size and 3rd partition is 10% greater than 1st or 2nd( since 1 & 2nd partition of same size.). You can use fdisk command to create partition and make sure partition type must be FD. In fdisk command use option t to change partition type.

eg. I have created /dev/sda1, /dev/sdb1 and /dev/sdc1.

Once you created 3 partitions use this to make RAID 5:
#mdadm --create /dev/md0 --level=5 --raid-device=3 /dev/sd{a1,b1,c1}

Check the RAID partition using:
#less /proc/mdstat

Or you can see detail information's using:
#mdadm --detail /dev/md0

To rebuild corrupted partation use:
#mdadm /dev/md0 -r /dev/sdb0

Thursday, July 10, 2008

Swap Filesystem Creation

Partition Creation for Swap filesystem
1. fdisk -l
2. fdisk /dev/sda
3. Type p & Press Enter
4. Type n & Press Enter
5. Just Press Enter for 1st Cylinder size
6. Type +sizeM for last Cylinder size
7. Type p & Press Enter
8. Type t & Press Enter
9. t2 /dev/sda12
10. Type 82 & Press Enter
11. Type p & Press Enter
12. Type w & Press Enter
13. partprobe
14. swapon -s
15. swapoff /dev/sda7 => Swapoff the another swap partition
16. swapon -s

Creation of a new Swap Filesystem
1. mkswap -v1 /dev/sda12
2. swapon /dev/sda12
3. swapon /dev/sda7
Here /dev/sda7 & /dev/sda12 are swap partition.

For automounting the either or swap partition do the following :

1. vi /etc/fstab
2. Add the following line :-

/dev/sda12 swap swap defaults 0 0

Note :- Partition Id identifies what type of filesystem will have to create. Id is Hexacode number. Maximum 4 partition can be create 3 primary & 1 Extended.

Filesystem ID
Ext2 / Ext3 ( Linux) 83
Swap 82
Fat32 C

Linux partition using fdisk

Linux partition using fdisk

1. fdisk -l => To check what type of Hard Disk i.e. Sata ( /dev/sda ) or Pata ( /dev/hda )
2. fdisk /dev/sda
3. Type n then Enter => For new Partition
4. Just press Enter => For 1st Cylinder
5. Type +size and press Enter => For Last Cylinder for Example +1000M. Size can be in terms of M or K
6. Type p => To print the partition
7. Type w => To save the new partition. It's save in the hard disk but kernel partition table not updated. (/dev/sda11 is created in my system , might be different in your system)
8. Type partprobe & Press Enter => To update the kernel.
9. mkfs.ext3 -b 2048 /dev/sda11 => Here b is the block & is \block size in bytes & /dev/sda11 is new partition has created
11. e2label /dev/sda11 data=> data is Label name
12. e2label /dev/sda11
13. mkdir /data => To mount the partition /dev/sda11 /data is a directory
14. mount /dev/sda11 /data
15. ls /data
To make this above mount point for /dev/sda11 permanent write entry in the /etc/fstab file by the following way :-

1.vi /etc/fstab
2. LABEL=data /data ext3 defaults 0 0

=> defaults means how will it be mount by which criteria rw,exec,acl etc. First 0 is for dump value i.e. Whether there will be automatic dumping or not means or off. Next 0 is fsck sequence value i.e. If there is any improperly shutdown occurs then the system again then which file it will check for consistency.0 means it doesn't check.

Friday, May 02, 2008

instant Messenger: Openfire, Spark & web chat (Fastpath)

-> Openfire
1 . lynx http://www.igniterealtime.org/downloads/download-landing.jsp?file=openfire/openfire-3.4.5-1.i386.rpm
2 . rpm -ivh openfire-3.4.5-1.i386.rpm
3 . /etc/rc.d/init.d/openfire status
4 . /etc/rc.d/init.d/openfire start
5. Make sure that the firewall is stopped.
6 . http://www.grmtech.com:9090/
7 . From the plugin tab in the web based admin control panel: installed Asterisk-IM Openfire

-> Spark
Download and install on client system.
http://www.igniterealtime.org/downloadServlet?filename=spark/spark_2_5_8.exe

-> web chat
Go to plugin tab in the web based admin control panel:
1.Click on 'Available Plugins'
2. Install the following plugin
a. Spark Fastpath Webchat
b. Fastpath Service
c. Monitoring Service (its is a optional)

How to make a linux server act as a gateway

1. turned on IP forwarding in sysctl.conf by setting the value to 1
2. gave the ip tables command for nat masquerade.
iptables -t nat -A POSTROUTING -o eth0 -j MASQUERADE
iptables -t nat -A POSTROUTING -o eth1 -j MASQUERADE
Checked that the commands took effect by:
iptables-save
and then made the entries from iptables-save inside the file /etc/sysconfig/iptables

Check and Rebuilding failed Linux software RAID

# cat /proc/mdstat
# mdadm -D /dev/md0
Detail : http://sitearticles.com/cms/show/43.html

ssh commands to log in without the password

ssh commands to log in without the password
# ssh-keygen -t rsa
* This will generate your id_rsa and id_rsa.pub in the .ssh directory in your home directory
* copy the id_rsa.pub to the .ssh directory of the remote host you want to logon to as authorized_keys2
* If you have more than one host from which you want to connect to the remote host, you need to add the local host's id_rsa.pub as one line in the authorized_keys2 file of the remote host command for the 1and1 servers is:
# scp .ssh/id_rsa.pub u35894953@217.160.226.69:./.ssh/authorized_keys2

:)

Sunday, April 13, 2008

Apache: Proxy and ReverseProxy Server

Redirect your all traffic:
Case:
example.com A record is point to server with IP10.1.31.7 (mean its resolves to IP 10.1.31.7 ), but you are running your web server from example.com on server with IP 10.1.31.8.
So, you want all traffic coming to 10.1.31.7 will redirect to 10.1.31.8.

Do the following changes on server have IP 10.1.31.7 :
1. Run apache.
2. Do the following entry in apache.
a. NameVirtualHost 10.1.31.7
b <VirtualHost 10.1.31.7:80 >
ServerName example.com
ServerAlias www.example.com
DocumentRoot /home/test
ProxyRequests off
ProxyPass / http://www.example.com/
ProxyPassReverse / http://www.example.com/
<Location />
ProxyPassReverse /
</Location>
</VirtualHost>
3. Do the following entry in /etc/hosts.
10.1.31.8 example.com
10.1.31.8 www.example.com
(make sure once you #ping example.com from 10.1.31.7 it resolver's to 10.1.31.8).

Note: its redirect only http request not https.

more you can see on this link

Saturday, April 12, 2008

Removing all blank lines, leading and trailing blank spaces

Removing all blank lines, leading and trailing blank spaces :
#sed '/^$/d; s/^[ ]*//g; s/[ ]*$//g' prabhat.txt > kumar.txt

This command will create new file (kumar.txt) on which it removes blank lines, leading and trailing blank spaces.

Friday, April 11, 2008

Changing Run Levels

On production environment normal run level 3 is used and it get rarely changed.
Runlevel and usage:
  • 0 — Halt
  • 1 — Single-user mode
  • 2 — Not used (user-definable)
  • 3 — Full multi-user mode
  • 4 — Not used (user-definable)
  • 5 — Full multi-user mode (with an X-based login screen)
  • 6 — Reboot
Check run level using :-
#who -r or #runlevel

Change run level using:-
#telinit 5 or
open file
#emacs /etc/inittab
Look for the default runlevel called initdefault which look like as follows:
id:3:initdefault:
Replace run level x with y (where x is current run level and y you want to set).

Set services in run level using :
#ntsysv or
#
chkconfig or
#serviceconf

Tuesday, April 01, 2008

How To: Transfer your PuTTY settings between computers

Putty stores its settings in the Windows registry. To save a backup of your Putty settings, you'll need to export this registry key to a file.

HKEY_CURRENT_USER\Software\SimonTatham

Steps :
1. Click Start->Run and type "RegEdt32" in the "Open" dialog. Click "Ok"
2. One RegEdt32 starts, you'll be presented with an application.
3. Press "Ctrl+F" to bring up the Find dialog. Enter the name of the key, "SimonTratham" in the "Find What" field, and make sure only "Keys" is checked in the "Look At" section of the dialog. Finally, click "Find Next"
4. The search may take a while, reminding us that the Windows Registry is a large and mysterious place where dragons be. Let's use these few seconds to reflect on the fact that you should never, ever, never change things in the registry unless you are absolutely, positively, totally, completely, 100% dead sure that you know exactly what you're doing. When the search completes we'll see the key name for which we're looking.
5. Click File->Export. Give your file an appropriate name like, "putty.reg" and click "Save"
6. We're done! Save the putty.reg file somewhere safe. The file doesn't contain any passwords or actual SSH key values so, it's relatively safe from prying eyes. Still, it does contain your configuration and that kind of data is a private matter.


Importing Your PuTTy Configuration:
Windows will ask you for confirmation that you want to import this set of registry values. We know this file is safe, because we created it but, you should never import registry information from an unknown source

Wednesday, March 19, 2008

Remove all empty directories

$ cleanlinks

this is supported on few flavor of Linux (XFree86), you can use this script.

#/bin/bash
DIR="$1"
[ -d $DIR ] && [ $(ls -l $DIR | wc -l) -eq 1 ] && rmdir $DIR || :


$ script.sh dir1

Removing blank line from file

Using sed.
$ sed '/^$/d' withblankline.txt > withoutblankline.txt
Using grep.
$ grep -v '^$' withblankline.txt > withoutblankline.txt

Use following for loop (shell script) to remove all blank lines from all files stored in /home/prabhat/data directory:

#!/bin/sh
files="/home/prabhat/data/*.txt"
for f in $files
do
sed '/^$/d' $i > $i.out
mv $i.out $i
done

How to check reverse DNS

The DNS is used to determine what IP address is associated with a given host name, so to reverse resolve a known IP address is to lookup what the associated host name for it. A reverse lookup is often referred to simply as reverse resolving, or more specifically reverse DNS lookups.

Use of reverse DNS.
Anti-spam
Network troubleshooting
Avoid spammers and phishers using a forward confirmed reverse DNS etc

Check reverse DNS for given IP address under Linux or Windows XP/Server 2003.
You can use standard UNIX / Linux utilities such as nslookup, dig or hosts to find out reverse DNS of a given IP address.

eg; under Linux/UNIX/
$ host 66.65.123.34
or
dig -x IP (66.65.123.34)
and under Linux/UNIX/Windows
nslookup 66.65.123.34

Monday, January 07, 2008

ssh warning

This is not a big thing, but sometime this small things matter a lot.

You can put a message on remote ssh login for user or it will just act as a warning for a defaulters.

Steps:
1. Open a file using : emacs /etc/motd and write a messge you want
e.g.
********************************************************************
* *
* This system is for the use of authorized users only. Usage of *
* this system may be monitored and recorded by system personnel. *
* *
* Anyone using this system expressly consents to such monitoring *
* and is advised that if such monitoring reveals possible *
* evidence of criminal activity, system personnel may provide the *
* evidence from such monitoring to law enforcement officials. *
* *
********************************************************************
==========================================================
Unauthorized access to this machine is prohibited
Press if you are not an authorized user

2. Save the file and exist.
3. Restart the ssh service using. #service sshd restart

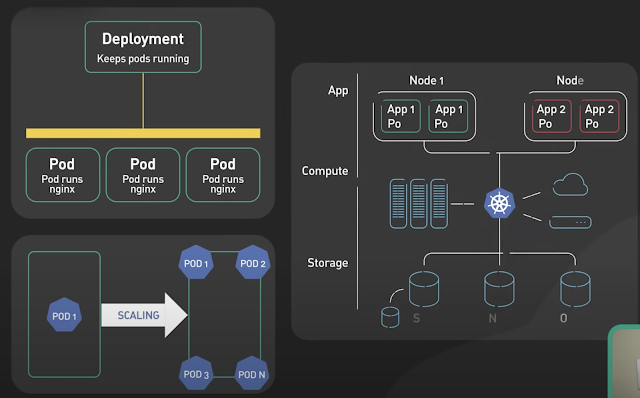
Basics of Kubernetes

 Kubernetes, often abbreviated as K8s , is an open-source platform designed to automate the deployment, scaling, and management of container...