Sunday, July 26, 2015

InnoDB data off the disk

MySQL's InnoDB storage engine data refresh every situation. This post from InnoDB down, look at the data from the memory to the InnoDB actually written on the media storage device in the end there is a buffer in which to work.

We look through the following figure at the relevant buffer:

From the figure above, we can see that the InnoDB data to disk need to go through
  •     InnoDB buffer pool, Redo log buffer. This is a buffer InnoDB application itself.
  •     page cache / Buffer cache (can be bypassed by o_direct). This is a buffer vfs layer.
  •     Inode cache / directory buffer. This is the buffer vfs layer. Need to refresh by O_SYNC or fsync ().
  •     Write-Back buffer. (You can set parameters to bypass the memory controller)
  •     Disk on-borad buffer. (Can be bypassed by setting the disk controller parameters)

Here we use the term "buffer" (typically buffer) to represent the data write scratch, using the term "cache" (usually cache) to represent the data read scratch. As the name suggests, due to the difference between the rate of the underlying storage device and memory buffer is used to temporarily "slow" to the underlying storage device IO's "red" attack. Cache is mainly in memory temporarily "stored" data read from the disk, for subsequent access to these data without accessing the slow underlying storage device again.

InnoDB layer

The layers are placed in host memory buffer, it is intended primarily at the application layer to manage their own data, read and write operations to avoid slow response times affect the InnoDB.

InnoDB layer consists of two buffer: redo log buffer and innodb buffer pool. redo log buffer for temporarily storing the redo log redo log log write, InnoDB buffer pool from disk storage device to read the InnoDB data, also for InnoDB data write buffer, namely the dirty pages of data. If the host is powered off or abnormal downtime MySQL, innodb buffer pool will not be promptly flushed to disk, so you can only use InnoDB redo log to roll forward from a checkpoint; and if you can not redo log buffer is flushed to disk, then since redo log in loss of data, even if the use of redo roll before the transaction submitted by users because there is no real record of the non-volatile disk medium, it lost out.

Control redo log buffer refresh timing parameters are innodb_flush_log_at_trx_commit, and control redo log buffer and parameters innodb buffer pool refresh mode is innodb_flush_method. Aiming at these two parameters are very much in detail, we are here mainly from the perspective of the buffer to resolve.

Innodb_flush_log_at_trx_commit :
 
Control redo log buffer of innodb_flush_log_at_trx_commit currently supports three different parameter values ​​0,1,2

In addition, the update about changes innodb_flush_log_at_trx_commit = 5.6 2:00:
<5 .6.6:="" buffer="" data="" disk="" every="" flush="" flushed="" in="" innodb_flush_log_at_timeout="" is="" log="" nbsp="" p="" redo="" second="" seconds.="" the="" to="">
Innodb_flush_method :

Control innodb buffer pool of innodb_flush_method currently supports four different parameter values:
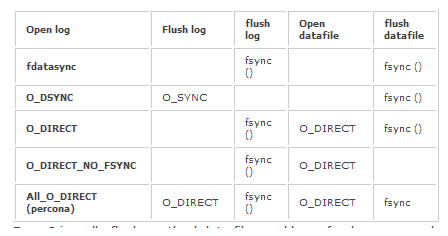
  •     fdatasync
  •     O_DSYNC
  •     O_DIRECT
  •     O_DIRECT_NO_FSYNC

Here we note that there are several issues:

  •  innodb_flush_method specify not only the "Data File" refresh mode, also specify the "log file" refresh mode.
  • These parameters there are no parameters in the configuration windows environment, and now we are beginning not bird Gates brother it? In fact, wrote in a note inside, windows on the use async_unbuffered, and can not be modified, so the list is not written inside.
  • The first three parameters only allows 6.6 and 5.6.6 used in previous versions, starting from the 5.6.7 adds O_DIRECT_NO_FSYNC. That opens the file with the O_DIRECT, but no fsync () to synchronize data. Because of this relatively new Linux kernel and part of the file system, use O_DIRECT can ensure data security, without special then fsync () to synchronize, ensure meta data is flushed to non-volatile disk media. For example: XFS not use this parameter. O_DIRECT bypassing the page cache, why use fsync () and then refresh the following, we devoted the next section.
  • Some would say there is a small document referense bug, 6.6 versions prior to default is fdatasync, but there is not even within fdatasync value Valid Values ​​can be specified. 
 
 In fact, here is his deliberate, because fdatasync () and fsync () is not the same as the difference between O_DSYNC and O_SYNC same. Fdatasync and O_DSYNC only for data synchronization, fsync () and O_SYNC for data and metadata meta-data synchronization. But MySQL fdatasync parameter values ​​used to indicate "data file" and "Log File" is fsync () to open (note: not fdatasync ()), this is a historical reason, so 5.6 deliberately remove it from the optional values, to avoid misunderstanding. Of course, if you still want to use fsync () to sync, then do not specify anything for innodb_flush_method it.

  •  Apart O_DIRECT_NO_FSYNC, InnoDB uses fsync () to refresh "the data file." Exception is O_DIRECT_NO_FSYNC here.
  •     If O_DIRECT, O_DIRECT_NO_FSYNC, data files are opened O_DIRECT (on solaris () opened with directio, if Innodb data files are placed in a separate device, you can use forcedirectio makes the whole file system with directio when the mount is open Here specified as innodb instead because MySQL, MyISAM do not use directio ()


Virtual File System (VFS) Layer

The buffer layer are placed in host memory, its main purpose is to buffer data in the operating system layer, to avoid slow block device reads and writes affect the response time of the IO.


Careful study O_DIRECT / O_SYNC tag
Involved in the discussions preceding redo log buffer and innodb buffer pool in a lot of data refresh and data security issues, we in this section, devoted to the meaning O_DIRECT / O_SYNC tags.

 The figure, we see that the layer mainly page_cache / buffer cache / Inode-cache / Directory cache. Which page_cache / buffer cache main memory for buffering data and block data structure. The inode-cache for buffering inode, directory-cache directory structure for buffering data.

Depending on the file systems and operating systems, in general, a file write operation consists of two parts, the writing operation of the data itself, and the file attributes (metadata metadata) writes (here the file attributes include directory, inode, etc).

Understand these later, we can say relatively simple clear sign of the meaning of each:


  • Difference O_DSYNC and fdatasync () is: is all refreshed for the corresponding page cache and buffer cache at the time of each IO submitted; or write to certain data after calling fdatasync () the moment of the whole page cache and buffer cache refresh. O_SYNC and fsync () of the difference between empathy.
  • The main difference between the page cache and buffer cache is that one is for the actual file data, a block-oriented devices. Using the open () mode in the upper VFS open those files using mkfs to make the file system, you will use the page cache and buffer cache, and if you use the dd this way on the Linux operating system to operate a Linux block device, You can only use buffer cache.
  • O_DSYNC and O_SYNC difference lies: O_DSYNC tell the kernel, when data is written to the file only when data is written to the disk, the write operation is completed (write before returning success). O_SYNC O_DSYNC more stringent than, not only requires the data has been written to disk, and attribute the corresponding data files (such as file inode, changes in relevant directories, etc.) need to be updated to complete the write operation to be successful. O_SYNC seen to do more than O_DSYNC operation.
  • Open () the referense There is also a O_ASYNC, it is mainly used for terminals, pseudoterminals, sockets, and pipes / FIFOs, the signal driving the IO, sends a signal (SIGIO) When the device can read and write, the application process to capture this signal for IO operations.
  • O_SYNC and O_DIRECT are synchronized to write, that success will only write return.
Looking back, we will look at innodb_flush_log_at_trx_commit configuration is better understood. Why O_DIRECT IO directly bypassing the page cache / buffer cache ever need to fsync (), it is to put inode cache directory cache and metadata are flushed to the storage device.

And because updating the kernel and file system, the file system can guarantee some assurance in O_DIRECT mode without fsync () to synchronize the metadata will not cause data security issues, so InnoDB also provided O_DIRECT_NO_FSYNC way.

Of course, O_DIRECT to read and write are effective, especially for reading, it can ensure that read data is read from the storage device, rather than the cache. Avoid data cache data and storage devices is inconsistent (ie you by DRBD block device will update the underlying data, and for the non-distributed file system cache contents and storage devices on inconsistent data) . But we are here focused on the buffer (write buffer), it is not discussed in depth. This problem.
 
O_DIRECT advantages and disadvantages
 
Most of the recommended innodb_flush_method parameter values ​​are recommended to use in O_DIRECT, even in percona server branch also provides ALL_O_DIRECT, also used for the log file is opened O_DIRECT.

Advantages:

  • Saving operating system memory: O_DIRECT bypass the page cache / buffer cache, thus avoiding InnoDB read and write data in operating system takes up less memory, the more memory to leave a innodb buffer pool to use.
  • Saving CPU. In addition, the memory storage device to transfer mode mainly poll, interrupt and DMA mode. Use O_DIRECT way to make use of the operating system prompt DMA mode for storage devices operate, saving CPU.

Weaknesses

  • Byte alignment. O_DIRECT way required to write data, the memory is byte-aligned (aligned manner depending on the kernel and file system being used). This requires data at the time of writing need additional alignment operation. Via / sys / block / sda / queue / logical_block_size know aligned size, usually 512 bytes.
  • IO can not be merged. O_DIRECT bypassing the page cache / buffer cache to write directly to the storage device, so that if the same piece of data can not be hit repeatedly written in memory, page cache / buffer cache to write the function can not be merged into effect.
  • Lower sequential read and write efficiency. If you use O_DIRECT to open a file, the read / write operations will skip the cache, the read / write directly on the storage device. Because there is no cache, so the sequential read and write file usage efficiency O_DIRECT this small IO requests is relatively low.
In general, use O_DIRECT to set innodb_flush_method not 100% of all applications and scenarios are applicable.
 

Storage Controller Layer


The layers are placed in the corresponding buffer memory controller on-board cache, and its main purpose is to buffer data in memory controller layer to avoid slow block device reads and writes affect the response time of the IO. When data is fsync () and other brush to the storage layer, it is first sent to the storage controller layer. Common storage controller is Raid card, and now most of the Raid card has 1G or greater storage capacity. This buffer is generally volatile memory, through the onboard battery / capacitor to ensure that the data "volatile memory" of power after the machine will still be synchronized to the underlying disk storage media.
About storage controller we have some aspects to note:
  1. write back / write through:
With respect to whether the buffer, the general storage controllers provide write back and write through two ways. Under write back mode, the operating system writes data requests submitted written directly to buffer it returns success; in write through mode, the operating system writes data submitted written request must be true underlying disk media before returning success.
  1. Battery / capacitor differences:
In order to guarantee that power down the machine data in the "volatile" buffer can be instantly updated to the underlying disk media, there is a battery / capacitor to ensure the storage controller. Common battery capacity fade problem, that is to say from time to time, the on-board battery charge and discharge must be controlled to ensure that the battery capacity. In the battery charging and discharging process, is set to write-back memory controller will automatically become write through. The charge-discharge cycles (Learn Cycle cycle) is generally 90 days, LSI card can MegaCli to see:
#MegaCli -AdpBbuCmd -GetBbuProperties-AAll
BBU Properties for Adapter: 0
Auto Learn Period: 90 Days
Next Learn time: Tue Oct 14 05:38:43 2014
Learn Delay Interval: 0 Hours
Auto-Learn Mode: Enabled
If you find every once in IO request response time suddenly slow down, there may be a problem, oh. By MegaCli -AdpEventLog -GetEvents -f mr_AdpEventLog.txt -aALL log in Event Description: Battery started charging can determine whether there has occurred a case of charging and discharging.
Since the battery have this problem, a new Raid card is configured capacitance to ensure data "volatile" buffer can be instantly updated to the underlying disk media, so there is no question of charging and discharging.
  1. read / write ratio:
HP's smart array provides read and write cache distinction (Accelerator Ratio),
hpacucli ctrl all show config detail | grep 'Accelerator Ratio'
Accelerator Ratio: 25% Read / 75% Write
So you can set the ratio of cache read and write buffer cache for applications based on the actual situation.
  1. Open Direct IO
In order to allow the top of the device using Direct IO way to bypass the raid card, you need to set to open DirectIO Raid mode:
/ Opt / MegaRAID / MegaCli / MegaCli64 -LDSetProp -Direct -Immediate -Lall -aAll
  1. LSI flash raid:
We mentioned above the "volatile" buffer, if we now have a non-volatile buffer, and the capacity of several hundred G, such as the memory controller buffer to the underlying device is not more speed? As a veteran of the Raid card vendors, LSI now there is such a memory controller, use the write back mode and more dependent on the memory controller buffer applications can consider using this type of storage controller.
  1. write barriers
Currently raid card cache if a battery or capacitor protection for Linux is not visible, so the Linux system log files in order to ensure consistency, the default will open write barriers, that is, it will continue to refresh the "volatile "buffer, it will greatly reduce IO performance. So if you are convinced that the underlying cells can guarantee "volatile" buffer will brush to the underlying disk devices, you can add the disk mount -o nobarrier time.

Disk controller layer

The buffer layer are placed in the corresponding on-board disk controller cache. Storage device firmware (firmware) will be sorted by the rules will be synchronized to the media writes really go. This is mainly to ensure sequential write, mechanical disks, so you can try to make the move a head to do more disk write operations.
In general, DMA controller on the disk of this layer is carried out through DMA direct memory access controller, capable of saving CPU resources.
For the mechanical hard drive, because on conventional disk device and no battery capacitors, we can not guarantee that all data on the disk cache inside the machine power failure timely synchronized to the media, so we strongly recommend that closed off the disk cache.
Disk cache memory controller can turn off the layer. For example, using MegaCli off command is as follows:
MegaCli -LDSetProp -DisDskCache -Lall -aALL

Summary

From InnoDB to the final medium, we have gone through all kinds of cushion, their purpose is very clear, it is to solve: speed memory and disk does not match the problem, or that the disk speed is too slow.
Additionally, in fact, most know whether the data should buffer / cache or the application itself, VFS, storage controllers and disks can only be written by the delay (in order to merge duplicate IO, making random writes into sequential writes) to alleviate the underlying storage device slow slow response speed caused problems. Therefore, the type of database application will be to manage the buffer, and then try to avoid buffer operating system and the underlying equipment.
But in fact occur due to the current difference in speed SSDs and PCIe Flash SSD cards, memory, and disk is greatly reduced between these buffers if necessary, what can be improved hardware and software, hardware and software engineers, a major challenge.


Reference: http://www.codeproject.com/Articles/460057/HDD-FS-O_SYNC-Throughput-vs-Integrity
http://rdc.taobao.com/blog/dba/html/296_innodb_flush_method_performance.html
http://www.orczhou.com/index.php/2009/08/innodb_flush_method-file-io/
http://blog.csdn.net/yuyin86/article/details/8113305
http://www.mtop.cc/node/100
https://www.usenix.org/legacy/event/usenix01/full_papers/kroeger/kroeger_html/node8.html
http://www.lsi.com/downloads/Public/Direct%20Assets/LSI/Benchmark_Tips.pdf
http://www.lsi.com/products/flash-accelerators/pages/default.aspx .
https://access.redhat.com/documentation/en-US/Red_Hat_Enterprise_Linux/6/html/Storage_Administration_Guide/writebarrieronoff.html
http://en.wikipedia.org/wiki/Direct_memory_access
http://www.hgst.com/tech/techlib.nsf/techdocs/DFE76984029D3BE586256FAB0058B1A8/$file/DMA-white_paper_FINAL.pdf
http://en.wikipedia.org/wiki/Disk_buffer

Tuesday, July 14, 2015

DatabaseDesignBestPractices

20 Database Design Best Practices

  1. Use well defined and consistent names for tables and columns (e.g. School, StudentCourse, CourseID ...).
  2. Use singular for table names (i.e. use StudentCourse instead of StudentCourses). Table represents a collection of entities, there is no need for plural names.
  3. Don’t use spaces for table names. Otherwise you will have to use ‘{‘, ‘[‘, ‘“’ etc. characters to define tables (i.e. for accesing table Student Course you'll write “Student Course”. StudentCourse is much better).
  4. Don’t use unnecessary prefixes or suffixes for table names (i.e. use School instead of TblSchool, SchoolTable etc.).
  5. Keep passwords as encrypted for security. Decrypt them in application when required.
  6. Use integer id fields for all tables. If id is not required for the time being, it may be required in the future (for association tables, indexing ...).
  7. Choose columns with the integer data type (or its variants) for indexing. varchar column indexing will cause performance problems.
  8. Use bit fields for boolean values. Using integer or varchar is unnecessarily storage consuming. Also start those column names with “Is”.
  9. Provide authentication for database access. Don’t give admin role to each user.
  10. Avoid “select *” queries until it is really needed. Use "select [required_columns_list]" for better performance.
  11. Use an ORM (object relational mapping) framework (i.e. hibernate, iBatis ...) if application code is big enough. Performance issues of ORM frameworks can be handled by detailed configuration parameters.
  12. Partition big and unused/rarely used tables/table parts to different physical storages for better query performance.
  13. For big, sensitive and mission critic database systems, use disaster recovery and security services like failover clustering, auto backups, replication etc.
  14. Use constraints (foreign key, check, not null ...) for data integrity. Don’t give whole control to application code.
  15. Lack of database documentation is evil. Document your database design with ER schemas and instructions. Also write comment lines for your triggers, stored procedures and other scripts.
  16. Use indexes for frequently used queries on big tables. Analyser tools can be used to determine where indexes will be defined. For queries retrieving a range of rows, clustered indexes are usually better. For point queries, non-clustered indexes are usually better.
  17. Database server and the web server must be placed in different machines. This will provide more security (attackers can’t access data directly) and server CPU and memory performance will be better because of reduced request number and process usage.
  18. Image and blob data columns must not be defined in frequently queried tables because of performance issues. These data must be placed in separate tables and their pointer can be used in queried tables.
  19. Normalization must be used as required, to optimize the performance. Under-normalization will cause excessive repetition of data, over-normalization will cause excessive joins across too many tables. Both of them will get worse performance.
  20. Spend time for database modeling and design as much as required. Otherwise saved(!) design time will cause (saved(!) design time) * 10/100/1000 maintenance and re-design time.

Tuesday, January 27, 2015

MySQL: Kill sleeping connections using script

Kill Sleep Queries

It’s all too common for me to come across a box that is hopelessly overloaded with Apache requests and MySQL queries. Sometimes, it takes some brute force to keep the whole box from going under. When all else fails, I use the following one-liner to kill off all of those queries that have been running for too long.

mysql> select concat('KILL ',id,';') from information_schema.processlist where Command =    'Sleep'   and Time > 60 into outfile '/tmp/sleep_processes.txt'"
mysql> source /tmp/sleep_processes.txt

Slave Type Conversions - ER SLAVE CONVERSION FAILED

Replication with Differing Table Definitions on Master and Slave

Today, I have increased the size column varchar(5000) to varchar(10000) on slave for table.

alter table CASE_ACTIVITY modify remarks VARCHAR(10000)  DEFAULT NULL;

And, start getting below error and replication is stoped,

[ERROR] Slave SQL: Column 6 of table 'db.slave' cannot be converted from type 'varchar(5000)' to type 'varchar(10000)', Error_code: 1677


MySQL error code 1677 (ER SLAVE CONVERSION FAILED): Columns of table '%-.192s.%-.192s' cannot be converted from type '%-.32s' to type '%-.32s'

As a solution I changes slave_type_conversions

show global variables like '%slave_type_conversions%';

MySQL>  set global slave_type_conversions='ALL_NON_LOSSY'

And, it worked :)

Controlling what conversions are allowed is controlled with a new server variable SLAVE_TYPE_CONVERSIONS, which is of the type SET('ALL_LOSSY','ALL_NON_LOSSY'), that is, it is a set of allowed conversions. The default for this variable is the empty set, meaning that no conversions are allowed at all.

If the ALL_NON_LOSSY constant is in the set, all conversions (within each group) that do not lose any information are allowed. For example, replicating from CHAR(32) to TINYTEXT is allowed since the conversion goes to a wider field (even if it is a different type).
If the ALL_LOSSY constant is in the set, all conversions (again, within the same group) that could potentially lose information is allowed. For example, conversion to a narrower field on the slave, such as CHAR(32) to CHAR(16) is allowed. Note that non-lossy conversions are not automatically allowed when ALL_LOSSY is set.

Tuesday, January 13, 2015

MySQL Slave relay log corrupted

There is issues like “Relay log read failure: Could not parse relay log event entry” many times on MySQLslave node. Most of time in our cases, it’s due to Linux Server crashed/restarted unexpectedly.

The detail error is like this:

mysql> show slave status\G
*************************** 1. row ***************************
               Slave_IO_State: Waiting for master to send event
                  Master_Host: 146.23.1.34
                  Master_User: repl_user
                  Master_Port: 3306
                Connect_Retry: 60
              Master_Log_File: mysql-bin.002032
          Read_Master_Log_Pos: 537558834
               Relay_Log_File: mysql-relay-bin.003601
                Relay_Log_Pos: 461487606
        Relay_Master_Log_File: mysql-bin.002032
             Slave_IO_Running: Yes
            Slave_SQL_Running: No
              Replicate_Do_DB:
          Replicate_Ignore_DB:
           Replicate_Do_Table:
       Replicate_Ignore_Table:
      Replicate_Wild_Do_Table:
  Replicate_Wild_Ignore_Table:
                   Last_Errno: 1594
                   Last_Error: Relay log read failure: Could not parse relay log event entry. The possible reasons are: the master's binary log is corrupted (you can check this by running 'mysqlbinlog' on the binary log), the slave's relay log is corrupted (you can check this by running 'mysqlbinlog' on the relay log), a network problem, or a bug in the master's or slave's MySQL code. If you want to check the master's binary log or slave's relay log, you will be able to know their names by issuing 'SHOW SLAVE STATUS' on this slave.
                 Skip_Counter: 0
          Exec_Master_Log_Pos: 461487460
              Relay_Log_Space: 537764119
              Until_Condition: None
               Until_Log_File:
                Until_Log_Pos: 0
           Master_SSL_Allowed: No
           Master_SSL_CA_File:
           Master_SSL_CA_Path:
              Master_SSL_Cert:
            Master_SSL_Cipher:
               Master_SSL_Key:
        Seconds_Behind_Master: NULL
Master_SSL_Verify_Server_Cert: No
                Last_IO_Errno: 0
                Last_IO_Error:
               Last_SQL_Errno: 1594
               Last_SQL_Error: Relay log read failure: Could not parse relay log event entry. The possible reasons are: the master's binary log is corrupted (you can check this by running 'mysqlbinlog' on the binary log), the slave's relay log is corrupted (you can check this by running 'mysqlbinlog' on the relay log), a network problem, or a bug in the master's or slave's MySQL code. If you want to check the master's binary log or slave's relay log, you will be able to know their names by issuing 'SHOW SLAVE STATUS' on this slave.
  Replicate_Ignore_Server_Ids:
             Master_Server_Id: 120
1 row in set (0.00 sec)


In this case, we can check if the bin log at master node is still available.
   
Relay_Master_Log_File: mysql-bin.002032
...

Exec_Master_Log_Pos: 461487460

If it’s still available at master node, we can reset slave to that point, and let it recover by itself as follows:

Be careful, using Relay_Master_Log_File value in “show slave status\G” for master_log_file, not Master_Log_File value. They’re the same in this case.


mysql> stop slave;
Query OK, 0 rows affected (0.01 sec)

mysql> change master to master_log_file='mysqlbin.002032',master_log_pos=461487460;
Query OK, 0 rows affected (0.30 sec)

Check slave status again and again, make sure Exec_Master_Log_Pos is increasing. Seconds_Behind_Master should be decreasing. If master is too busy, the delay may still increase, but it’ll catch up sooner or later.

mysql> show slave status\G
*************************** 1. row ***************************
               Slave_IO_State: Queueing master event to the relay log
                  Master_Host: 146.23.1.34
                  Master_User: repl_user
                  Master_Port: 3306
                Connect_Retry: 60
              Master_Log_File: mysql-bin.002032
          Read_Master_Log_Pos: 496939207
               Relay_Log_File: mysql-relay-bin.000002
                Relay_Log_Pos: 56472
        Relay_Master_Log_File: mysql-bin.002032
             Slave_IO_Running: Yes
            Slave_SQL_Running: Yes
              Replicate_Do_DB:
          Replicate_Ignore_DB:
           Replicate_Do_Table:
       Replicate_Ignore_Table:
      Replicate_Wild_Do_Table:
  Replicate_Wild_Ignore_Table:
                   Last_Errno: 0
                   Last_Error:
                 Skip_Counter: 0
          Exec_Master_Log_Pos: 461543679
              Relay_Log_Space: 35452156
              Until_Condition: None
               Until_Log_File:
                Until_Log_Pos: 0
           Master_SSL_Allowed: No
           Master_SSL_CA_File:
           Master_SSL_CA_Path:
              Master_SSL_Cert:
            Master_SSL_Cipher:
               Master_SSL_Key:
        Seconds_Behind_Master: 2782
Master_SSL_Verify_Server_Cert: No
                Last_IO_Errno: 0
                Last_IO_Error:
               Last_SQL_Errno: 0
               Last_SQL_Error:
  Replicate_Ignore_Server_Ids:
             Master_Server_Id: 120
1 row in set (0.00 sec)

Wednesday, November 05, 2014

MySQL Table cleanup

MySQL Table Cleanup

## This script will  is usefull for cleanup the table
# 1. rename table customer_table to customer_table_currentdate
# 2. create table customer_table with schema customer_table_currentdate
# 3. Copy 1 month data to customer_table from customer_table_currentdate

mysql -uprabhat -p'ab7^44' -e " use customermgt;  rename table customer_table to customer_table_`date '+%Y%m%d'`; create table customer_table like customer_table_`date '+%Y%m%d'`; INSERT INTO customer_table SELECT * FROM customer_table_`date '+%Y%m%d'`  where DATE(starttime) > '`date --date="1 months ago" +%Y-%m-%d`';" ;


mysqldump with where caluse

mysqldump  with where caluse,  selectively exporting data that matches the conditions.

One of this features of the MySQL mysqldump utility is to adapt the individual queries in order to limit the rows selected in the backup. This is achieved with the “-w” or “–where” which appends the same WHERE clause on each of the tables.

e.g.
mysqldump -uroot db_customer customer_table -w "date(cust_insert_time) < '2013-06-01 00:00:00' " --opt > db_db_customer customer_table_beforejun1.sql
or
mysqldump -uroot --no-create-info db_customer customer_table -w "date(cust_insert_time) < '2013-06-01 00:00:00' " --opt > db_db_customer customer_table_beforejun1.sql


MySQL User Privileges Migration

During the MySQL version upgrade or for easy user backup you can you below.
 
To export all MySQL user privileges run following script.
  
mysql -h {host_name} -u {user_name} -p{password} -Ne "select distinct concat( \"SHOW GRANTS FOR '\",user,\"'@'\",host,\"';\" ) from user;" mysql | mysql -h {host_name} -u {user_name} -p{password} | sed 's/\(GRANT .*\)/\1;/;s/^\(Grants for .*\)/## \1 ##/;/##/{x;p;x;}'

Note : Replace {host_name}, {user_name} and {password} with your values.

Above script will generate all grants statements.You can then take that output and run the statements against MySQL on the new server.

Tuesday, December 07, 2010

MySQL : Altering Huge Tables

You have a huge mysql table - maybe 100 GB. And you need to run alter on it - to either add an index, drop an index, add a column or drop a column. If you run the simple mysql "alter table" command, you will end up spending ages to bring the table back into production.

Here is a simple hack to get the thing done. The benefit of the hack is that the alter runs quite fast. But since this is a hack, you will need to take care of the backups - in case anything goes wrong. I have seen this hack work effectively with both MyISAM and InnoDB tables.

Here I have created a simple table to show this hack process. You can assume that this table has billions of rows and is more than 100GB in size.

CREATE TABLE `testhack` (
`id` int(11) NOT NULL DEFAULT '0',
`unq` varchar(100) DEFAULT NULL,
`keyword` varchar(250) DEFAULT NULL,
PRIMARY KEY (`id`),
UNIQUE KEY `unq` (`unq`)
) ENGINE=MyISAM

I need to drop the unique key. So, i have create a new table 'testhack_new' with the following schema

CREATE TABLE `testhack_new` (
`id` int(11) NOT NULL DEFAULT '0',
`unq` varchar(100) DEFAULT NULL,
`keyword` varchar(250) DEFAULT NULL,
PRIMARY KEY (`id`)
) ENGINE=MyISAM

Flush both tables with read lock

mysql> Flush tables with read lock;

Open another terminal. And go to the mysql/data/ directory. Do the following:

mysql/data/test $ mv testhack.frm testhack_old.frm; mv testhack_new.frm testhack.frm; mv testhack_old.frm testhack_new.frm; mv testhack.MYI testhack_old.MYI; mv testhack_new.MYI testhack.MYI; mv testhack_old.MYI testhack_new.MYI;

So, what is happening here is that the index, table definitions are being switched. After this process, the table definition of testhack will not contain the unique key. Now unlock the tables in the main window. And run repair tables to remove any issues.

mysql> unlock tables;
mysql> repair tables testhack;

+---------------+--------+----------+-------------------------------------------+
| Table | Op | Msg_type | Msg_text |
+---------------+--------+----------+-------------------------------------------+
| test.testhack | repair | warning | Number of rows changed from 0 to 20000000 |
| test.testhack | repair | status | OK |
+---------------+--------+----------+-------------------------------------------+

The repair table rebuilds the indexes. It is faster since it skips the use of key_cache for rebuilding the index (which is used in a normal alter table scenario).

Source :
http://www.mysqlperformanceblog.com/2007/10/29/hacking-to-make-alter-table-online-for-certain-changes/

Monday, September 13, 2010

mysql-packages

The RPM packages usages and details:

Ø MySQL-server-VERSION.glibc23.i386.rpm - The MySQL server. You need this unless you only want to connect to a MySQL server running on another machine.

Ø MySQL-client-VERSION.glibc23.i386.rpm - The standard MySQL client programs. You probably always want to install this package.

Ø MySQL-devel-VERSION.glibc23.i386.rpm - The libraries and include files that are needed if you want to compile other MySQL clients, such as the Perl modules.

Ø MySQL-debuginfo-VERSION.glibc23.i386.rpm - This package contains debugging information. debuginfo RPMs are never needed to use MySQL software; this is true both for the server and for client programs. However, they contain additional information that might be needed by a debugger to analyze a crash.

Ø MySQL-shared-VERSION.glibc23.i386.rpm - This package contains the shared libraries (libmysqlclient.so*) that certain languages and applications need to dynamically load and use MySQL. It contains single-threaded and thread-safe libraries. If you install this package, do not install the MySQL-shared-compat package.

Ø MySQL-shared-compat-VERSION.glibc23.i386.rpm - This package includes the shared libraries for MySQL 3.23, 4.0, and so on, up to the current release. It contains single-threaded and thread-safe libraries. Install this package instead of MySQL-shared if you have applications installed that are dynamically linked against older versions of MySQL but you want to upgrade to the current version without breaking the library dependencies.

Ø MySQL-shared-compat-advanced-gpl-VERSION.glibc23.i386.rpm, MySQL-shared-compat-advanced-VERSION.glibc23.i386.rpm - These are like the MySQL-shared-compat package, but are for the “MySQL Enterprise Server – Advanced Edition” products. Install these packages rather than the normal MySQL-shared-compat package if you want to included shared client libraries for older MySQL versions.

Ø MySQL-embedded-VERSION.glibc23.i386.rpm - The embedded MySQL server library.
Ø MySQL-ndb-management-VERSION.glibc23.i386.rpm, MySQL-ndb-storage-VERSION.glibc23.i386.rpm, MySQL-ndb-tools-VERSION.glibc23.i386.rpm, MySQL-ndb-extra-VERSION.glibc23.i386.rpm - Packages that contain additional files for MySQL Cluster installations.
o Note : The MySQL-ndb-tools RPM requires a working installation of perl. Prior to MySQL 5.1.18, the DBI and HTML::Template packages were also required. See Section 2.15, “Perl Installation Notes”, and Section 17.4.21, “ndb_size.pl — NDBCLUSTER Size Requirement Estimator”, for more information.

Ø MySQL-test-VERSION.glibc23.i386.rpm - This package includes the MySQL test suite.
Ø MySQL-VERSION.src.rpm - This contains the source code for all of the previous packages. It can also be used to rebuild the RPMs on other architectures (for example, Alpha or SPARC).

Default Installation Directory :

Directory -> Contents of Directory
/usr/bin -> Client programs and scripts
/usr/sbin -> The mysqld server
/var/lib/mysql -> Log files, databases
/usr/share/info -> Manual in Info format
/usr/share/man -> Unix manual pages
/usr/include/mysql -> Include (header) files
/usr/lib/mysql -> Libraries
/usr/share/mysql -> Miscellaneous support files, including error messages, character set files, sample configuration files, SQL for database installation
/usr/share/sql-bench -> Benchmarks

Sunday, June 27, 2010

Security Issues with MySQL ROOT Access

Security Issues with MySQL ROOT Access

MySQL offers simple but very effective security mechanisms. Unfortunately, the default installation of MySQL, and in particular the empty root password and the potential vulnerability to buffer overflow attacks, makes the database an easy target for attacks.
In order to achieve the highest possible level of security, the installation and configuration of MySQL should be performed in accordance with the following security requirements:

* MySQL processes must run under a unique UID/GID that is not used by any other system process.
* Only local access to MySQL need to be allowed.(some exceptions for jobs/backups)
* MySQL root's account must be protected by a complex/hard to guess password.
* The administrator's account (root) need to be renamed.
* Anonymous access to the database (by using the nobody account) must be disabled.

MySQL Security risks can be categorized into the following.

* Filesystem security risks. MySQL Installation (basedir) and database information (datadir) and other log (querylog/slowlog) files that contain information about queries that clients execute. These files/directories need to be protected so that other users who have login accounts on the server host cannot access them directly.
* Network security risks. The MySQL server provides access to databases by allowing clients to connect and make requests. Information about client accounts is stored in the mysql database. Each account should be set up with privileges that provide access only to the data the accounts needs to see or modify.

MySQL root account has full privileges to perform any database operation, so it's important to assign the account a password that is not easily guessed. Note that usernames and passwords for MySQL accounts are unrelated to those for system login accounts. OS login and MySQL login both should not be the same.

Restrict anonymous remote access

Grant access to specific users from specific hosts only. Do not grant access from all hosts.
Do not grant the PROCESS or SUPER privilege to non-administrative users. The output of mysqladmin processlist and SHOW PROCESSLIST shows the statements currently being executed, so any user who is allowed to see the server process list might be able to see statements issued by other users such as UPDATE user SET password=PASSWORD(pwd).

mysqld reserves an extra connection for users who have the SUPER privilege, so that a MySQL root user can log in and check server activity even if all normal connections are in use. This is very useful when MySQL reaches the max_connections threshold. This cannot be beneficial; if users root (which ever has SUPER privilege) is used for all client connections.
Do not grant the FILE privilege to non-administrative users. Any user that has this privilege can write a file anywhere in the file system with the privileges of the mysqld daemon. To make this a bit safer, files generated with SELECT ... INTO OUTFILE do not overwrite existing files and are writable by everyone.
The FILE privilege may also be used to read any file that is accessible to the Unix user that the server runs as. With this privilege, user can read any file into a database table. This could be abused, for example, by using LOAD DATA to load /etc/passwd into a table, which then can be displayed with SELECT.

Improve local security

Use different socket file for both client and server connections. The following parameter should be changed in the [client] section of /etc/my.cnf:
[client] socket = /tmp/mysql.sock

Change admin password


One of the most important steps in securing MySQL is changing the database administrator's password, which is empty by default. In order to change the administrator's password, follow the steps:
mysql -u root mysql> SET PASSWORD FOR root@localhost=PASSWORD('new_password');
It is good practice not to change passwords from the command line,(instead change at database level). This is especially important when other users working on the server. In that case the password could be easily revealed, e.g. by using the "ps aux" command or reviewing history files, when improper access rights are set to them.

Change admin name


It is also recommended to change the default name of administrator's account (root), to a different, harder to guess one. Such a change will make it difficult to perform brute-force and dictionary attacks on the administrator's password.
mysql> update user set user="mysqluser" where user="root"; mysql> flush privileges;

Remove history


We should also remove the content of the MySQL history file (~/.mysql_history, ~/.history, ~/.bash_history,~/.mysql_history) in which all executed SQL commands are being stored (especially passwords, which are stored as plain text).
User Access Privileges
We can create accounts for specific databases which will be used by specific applications. These accounts should have access rights only to the databases which are used by the specific applications. In particular, they should not have any access rights to the mysql database, nor any system or administrative privileges (FILE, GRANT, ALTER, SHOW DATABASE, RELOAD, SHUTDOWN, PROCESS, SUPER etc.). Application users should not granted all privileges to database with Grant option from any host.


mysql> select user,host,password from user; GRANT USAGE ON *.* TO 'user1'@'%' IDENTIFIED BY PASSWORD 'xxxxxx' | GRANT ALL PRIVILEGES ON `user1`.* TO 'glist'@'%' WITH GRANT OPTION

Friday, June 25, 2010

MySQL Development History

MySQL Development History

- MySQL was first released internally on 23 May 1995
- Windows version was released on January 8, 1998 for Windows 95 and NT
- Version 3.23: beta from June 2000, production release January 2001
- Version 4.0: beta from August 2002, production release March 2003
- Version 4.1: beta from June 2004, production release October 2004
- Version 5.0: beta from March 2005, production release October 2005
- Version 5.1: currently pre-production (since November 2005)
- Sun Microsystems acquires MySQL AB on 26 February 2008

MySQL Features History

- Version 3.23.23 Full-Text Search
- Version 4.0 Full-Text Search (IN BOOLEAN MODE), UNIONS
- Version 4.1 R-Tree and B-Tree, Sub-Queries, Prepared Statements
- Version 5.0 Cursors, Stored Procedures, Triggers, Views, XA Transactions
- Version 5.1 Event Scheduler, Partitioning, Plugin API, Row-Based Replication, Server Log Tables

Sunday, June 13, 2010

Display Information About File - Stat

In Unix/Linux world everything is treated as files. whether it is a devices, directories and sockets — all of these are files.

Stat command displays file or file system status.

[Prabhat@Server1 Archive]$ stat 1_16470_587807474.arc
File: `1_16470_587807474.arc'
Size: 208514560 Blocks: 407664 IO Block: 4096 regular file
Device: fd02h/64770d Inode: 17006596 Links: 1
Access: (0640/-rw-r-----) Uid: ( 500/ oracle) Gid: ( 500/ dba)
Access: 2010-06-12 23:28:58.000000000 -0700
Modify: 2010-06-12 23:31:22.000000000 -0700
Change: 2010-06-12 23:31:22.000000000 -0700

Details of Linux Stat Command Output

* File: `1_16470_587807474.arc’ – Name of the file.
* Size: 208514560 – File size in bytes.
* Blocks: 407664 – Total number of blocks used by this file.
* IO Block: 4096 – IO block size for this file.
* regular file – Indicates the file type. This indicates that this is a regular file. Following are available file types.
o regular file. ( ex: all normal files ).
o directory. ( ex: directories ).
o socket. ( ex: sockets ).
o symbolic link. ( ex: symbolic links. )
o block special file ( ex: hard disk ).
o character special file. ( ex: terminal device file ).

* Device: fd02h/64770d – Device number in hex and device number in decimal
* Inode: 17006596 – Inode number is a unique number for each file which is used for the internal maintenance by the file system.
* Links: 1 – Number of links to the file
* Access: (0640/-rw-r-----): Access specifier displayed in both octal and character format. Let us see explanation about both the format.
* Uid: ( 500/oracle) – File owner’s user id and user name are displayed.
* Gid: ( 500/dba) – File owner’s group id and group name are displayed.
* Access: 2010-06-12 23:28:58.000000000 -0700 – Last access time of the file.
* Modify: 2010-06-12 23:31:22.000000000 -0700 – Last modification time of the file.
* Change: 2010-06-12 23:31:22.000000000 -0700 – Last change time of the inode data of that file.

Stat – Display Information About Directory

You can use the same command to display the information about a directory as shown below.

[Prabhat@Server1 oradata]$ stat Archive
File: `Archive'
Size: 12288 Blocks: 24 IO Block: 4096 directory
Device: fd02h/64770d Inode: 16990209 Links: 2
Access: (0755/drwxr-xr-x) Uid: ( 500/ oracle) Gid: ( 500/ dba)
Access: 2009-11-02 23:43:22.000000000 -0800
Modify: 2010-06-13 05:26:54.000000000 -0700
Change: 2010-06-13 05:26:54.000000000 -0700

Thursday, June 03, 2010

MySQL : About LIMIT 0 , 30

Limit is used to limit your MySQL query results to those that fall within a specified range. You can use it to show the first X number of results, or to show a range from X - Y results. It is phrased as Limit X, Y and included at the end of your query.
X is the starting point (remember the first record is 0) and Y is the duration (how many records to display).

Table 'example' have following data.
SELECT * FROM `example` ORDER BY `example`.`age` ASC LIMIT 0 , 30
id name age
3 Amit 26
5 pani 27
2 Sanjay 28
4 Lucky 29
6 atul 30
1 Kumar 31

SELECT * FROM `example` ORDER BY `example`.`age` ASC LIMIT 3 , 1

id name age

4 Lucky 29
This will show records 3rd only (remember the first record is 0)

Thursday, May 27, 2010

MySQL : Allocating memory for caches

Allocating memory for caches in MySQL

If the server is dedicated to MySQL, any memory you don’t reserve for the operating system or for query processing is available for caches.
MySQL needs more memory for caches than anything else. It uses caches to avoid disk access, which is orders of magnitude slower than accessing data in memory. The operating system may cache some data on MySQL’s behalf (especially for MyISAM),but MySQL needs lots of memory for itself too.

The following are the most important caches to consider for the majority of installations:
• The operating system caches for MyISAM data
• MyISAM key caches
• The InnoDB buffer pool
• The query cache
There are other caches, but they generally don’t use much memory.

It is much easier to tune a server if you’re using only one storage engine. If you’re using only MyISAM tables, you can disable InnoDB completely, and if you’re using only InnoDB, you need to allocate only minimal resources for MyISAM (MySQL uses MyISAM tables internally for some operations). But if you’re using a mixture of storage engines, it can be very hard to figure out the right balance between them.

The MyISAM Key Cache

The MyISAM key caches are also referred to as key buffers; there is one by default, but you can create more. Unlike InnoDB and some other storage engines, MyISAM itself caches only indexes, not data (it lets the operating system cache the data). If you use mostly MyISAM, you should allocate a lot of memory to the key caches.

The most important option is the key_buffer_size, which you should try setting to between 25% and 50% of the amount of memory you reserved for caches. The remainder will be available for the operating system caches, which the operating system will usually fill with data from MyISAM’s .MYD files.

MySQL 5.0 has a hard upper limit of 4 GB for this variable, no matter what architecture you’re running. (MySQL 5.1 allows larger sizes. Check the current documentation for your version of the server.)

By default MyISAM caches all indexes in the default key buffer, but you can create multiple named key buffers. This lets you keep more than 4 GB of indexes in memory at once. To create key buffers named key_buffer_1 and key_buffer_2, each sized at 1 GB, place the following in the configuration file:
key_buffer_1.key_buffer_size = 1G
key_buffer_2.key_buffer_size = 1G
Now there are three key buffers: the two explicitly created by those lines and the default buffer. You can use the CACHE INDEX command to map tables to caches. You can also tell MySQL to use key_buffer_1 for the indexes from tables t1 and t2 with the following SQL statement:
mysql> CACHE INDEX t1, t2 IN key_buffer_1;
Now when MySQL reads blocks from the indexes on these tables, it will cache the blocks in the specified buffer. You can also preload the tables’ indexes into the cache with the LOAD INDEX command:
mysql> LOAD INDEX INTO CACHE t1, t2;

You can place this SQL into a file that’s executed when MySQL starts up. The filename must be specified in the init_file option, and the file can include multiple SQL commands, each on a single line (no comments are allowed). Any indexes you don’t explicitly map to a key buffer will be assigned to the default buffer the first time MySQL needs to access the .MYI file.

You can monitor the performance and usage of the key buffers with information from SHOW STATUS and SHOW VARIABLES. You can calculate the hit ratio and the percentage of the buffer in use with these equations:
Cache hit ratio
100 - ( (Key_reads * 100) / Key_read_requests )
Percentage of buffer in use
100 - ( (Key_blocks_unused * key_cache_block_size) * 100 / key_buffer_size )

It’s good to know the cache hit rate, but this number can be misleading. For example,the difference between 99% and 99.9% looks small, but it really represents a tenfold increase. The cache hit rate is also application-dependent: some applications might work fine at 95%, whereas others might be I/O-bound at 99.9%. You might even be able to get a 99.99% hit rate with properly sized caches.

The number of cache misses per second is generally much more empirically useful. Suppose you have a single hard drive that can do 100 random reads per second. Five misses per second will not cause your workload to be I/O-bound, but 80 per second
will likely cause problems.
You can use the following equation to calculate this value cache misses:
Key_reads / Uptime
Calculate the number of misses incrementally over intervals of 10 to 100 seconds, so you can get an idea of the current performance. The following command will show the incremental values every 10 seconds:
$ mysqladmin extended-status -r -i 10 | grep Key_reads
When you’re deciding how much memory to allocate to the key caches, it might help to know how much space your MyISAM indexes are actually using on disk. You don’t need to make the key buffers larger than the data they will cache.
Space your MyISAM indexes are actually using on disk
$ du -sch `find /path/to/mysql/data/directory/ -name "*.MYI"`

Remember that MyISAM uses the operating system cache for the data files, which are often larger than the indexes. Therefore, it often makes sense to leave more memory for the operating system cache than for the key caches. Finally, even if you don’t have any MyISAM tables, bear in mind that you still need to set key_buffer_size to a small amount of memory, such as 32M. The MySQL server sometimes uses MyISAM tables for internal purposes, such as temporary tables for GROUP BY queries.

The MyISAM key block size The key block size is important (especially for write-intensive workloads) because of the way it causes MyISAM, the operating system cache, and the filesystem to interact. If the key block size is too small, you may encounter read-around writes, which
are writes that the operating system cannot perform without first reading some data from the disk. Here’s how a read-around write happens, assuming the operating system’s page size is 4 KB (typically true on the x86 architecture) and the key block size is 1 KB:
1. MyISAM requests a 1 KB key block from disk.
2. The operating system reads 4 KB of data from the disk and caches it, then passes the desired 1 KB of data to MyISAM.
3. The operating system discards the cached data in favor of some other data.
4. MyISAM modifies the 1 KB key block and asks the operating system to write it back to disk.
5. The operating system reads the same 4 KB of data from the disk into the operating system cache, modifies the 1 KB that MyISAM changed, and writes the entire
4 KB back to disk.

The read-around write happened in step 5, when MyISAM asked the operating system to write only part of a 4 KB page. If MyISAM’s block size had matched the operating system’s, the disk read in step 5 could have been avoided.*Unfortunately, in MySQL 5.0 and earlier, there’s no way to configure the key block size. However, in MySQL 5.1 and later, you can avoid read-around writes by making MyISAM’s key block size the same as the operating system’s. The myisam_block_size variable controls the key block size. You can also specify the size for each key with the KEY_BLOCK_SIZE option in a CREATE TABLE or CREATE INDEX statement, but because all keys are stored in the same file, you really need all of them to have blocks as large as or larger than the operating system’s to avoid alignment issues that could still cause read-around writes. (For example, if one key has 1 KB blocks and another has 4 KB blocks, the 4 KB block boundaries might not match the operating system’s page boundaries.)

The InnoDB Buffer Pool

If you use mostly InnoDB tables, the InnoDB buffer pool probably needs more memory than anything else. Unlike the MyISAM key cache, the InnoDB buffer pool doesn’t just cache indexes: it also holds row data, the adaptive hash index, the insert buffer, locks, and other internal structures. InnoDB also uses the buffer pool to help it delay writes, so it can merge many writes together and perform them sequentially. In short, InnoDB relies heavily on the buffer pool, and you should be sure to allocate enough memory to it.

The MySQL manual suggests using up to 80% of the machine’s physical memory for the buffer pool on a dedicated server; in reality, you can use more than that if the machine has a lot of memory.

As with the MyISAM key buffers, you can use variables from SHOW commands or tools such as innotop to monitor your InnoDB buffer pool’s memory usage and performance. There’s no equivalent of LOAD INDEX INTO CACHE for InnoDB tables. However, if you’re trying to warm up a server and get it ready to handle a heavy load, you can issue queries that perform full table scans or full index scans.

In most cases, you should make the InnoDB buffer pool as large as your available memory allows. However, in rare circumstances, very large buffer pools (say, 50 GB) can cause long stalls. For example, a large buffer pool may become slow during checkpoints or insert buffer merge operations, and concurrency can drop as a result of locking. If you experience these problems, you may have to reduce the buffer pool size.

You can change the innodb_max_dirty_pages_pct variable to instruct InnoDB to keep more or fewer dirty (modified) pages in the buffer pool. If you allow a lot of dirty pages, InnoDB can take a long time to shut down, because it writes the dirty pages to the data files upon shutdown.
You can monitor the number of dirty pages by watching the Innodb_buffer_pool_pages_dirty server status variable or using innotop to monitor SHOW INNODB STATUS.
Lowering the value of the innodb_max_dirty_pages_pct variable doesn’t actually guarantee that InnoDB will keep fewer dirty pages in the buffer pool. Instead, it controls the threshold at which InnoDB stops being “lazy.” InnoDB’s default behavior is to flush dirty pages with a background thread, merging writes together and performing them sequentially for efficiency. This behavior is called “lazy” because it lets InnoDB delay flushing dirty pages in the buffer pool, unless it needs to use the space for some other data. When the percentage of dirty pages exceeds the threshold, InnoDB will flush pages as quickly as it can to try to keep the dirty page count lower. The variable’s default value is 90, so by default InnoDB will flush lazily until the buffer pool is 90% full of dirty pages. You can tweak the threshold for your workload if you wish to spread out the writes a bit more. For example, lowering it to 50 will generally cause InnoDB to do more write operations, because it will flush pages sooner and therefore be unable to batch the writes as well. However, if your workload has a lot of write spikes, using a lower value may help InnoDB absorb the spikes better: it will have more “spare” memory to hold dirty pages, so it won’t have to wait for other dirty pages to be flushed to disk.

The Thread Cache

The thread cache holds threads that aren’t currently associated with a connection but are ready to serve new connections. When there’s a thread in the cache and a new connection is created, MySQL removes the thread from the cache and gives it to the new connection. When the connection is closed, MySQL places the thread back into the cache, if there’s room. If isn’t room, MySQL destroys the thread. As long as MySQL has a free thread in the cache, it can respond very rapidly to connect requests, because it doesn’t have to create a new thread for each connection.
The thread_cache_size variable specifies the number of threads MySQL can keep in the cache. You probably won’t need to tune this value, unless your server gets many connection requests. To check whether the thread cache is large enough, watch the Threads_created status variable. We generally try to keep the thread cache large enough that we see fewer than 10 new threads created each second, but it’s often pretty easy to get this number lower than 1 per second.

A good approach is to watch the Threads_connected variable and try to set thread_cache_size large enough to handle the typical fluctuation in your workload. For example, if Threads_connected usually stays between 100 and 200, you can set the cache size to 100. If it stays between 500 and 700, a thread cache of 200 should be large enough. Think of it this way: at 700 connections, there are probably no threads in the cache; at 500 connections, there are 200 cached threads ready to be used if the load increases to 700 again. Making the thread cache very large is probably not necessary for most uses, but keeping it small doesn’t save much memory, so there’s little benefit in doing so. Each thread that’s in the thread cache or sleeping typically uses around 256 KB of memory. This is very little compared to the amount of memory a thread can use when a connection is actively processing a query. In general, you should keep your thread cache large enough that Threads_created doesn’t increase very often. If this is a very large number, however (e.g., many thousand threads), you might want to set it lower because some operating systems don’t handle very large numbers of threads well, even when most of them are sleeping.

The Table Cache

The table cache is similar in concept to the thread cache, but it stores objects that represent tables. Each object in the cache contains the associated table’s parsed .frm file, plus other data. Exactly what else is in the object depends on the table’s storage engine. For example, for MyISAM, it holds the table data and/or index file descriptors. For merge tables it may hold many file descriptors, because merge tables can have many underlying tables. The table cache can help you reuse resources. For instance, when a query requests access to a MyISAM table, MySQL might be able to give it a file descriptor from the cached object instead of opening the file. The table cache can also help avoid some of the I/O required for marking a MyISAM table as “in use” in the index headers.*The table cache’s design is a little MyISAM-centric—this is one of the areas where the separation between the server and the storage engines is not completely clean, for historical reasons. The table cache is a little less important for InnoDB, because InnoDB doesn’t rely on it for as many purposes (such as holding file descriptors; it has its own version of a table cache for this purpose). However, even InnoDB benefits from caching the parsed .frm files.

In MySQL 5.1, the table cache is separated into two parts: a cache of open tables and a table definition cache (configured via the table_open_cache and table_definition_cache variables). Thus, the table definitions (the parsed .frm files) are separated from
the other resources, such as file descriptors. Opened tables are still per-thread, pertable-used, but the table definitions are global and can be shared among all connections efficiently. You can generally set table_definition_cache high enough to cache all your table definitions. Unless you have tens of thousands of tables, this is likely to be the easiest approach. If the Opened_tables status variable is large or increasing, the table cache isn’t large enough, and you should increase the table_cache system variable (or table_open_cache, in MySQL 5.1). The only real downside to making the table cache very large is that it might cause longer shutdown times when your server has a lot of MyISAM tables, because the key blocks have to be flushed and the tables have to be marked as no longer open. It can also make FLUSH TABLES WITH READ LOCK take a long time complete, for the same reason.
If you get errors indicating that MySQL can’t open any more files (use the perror utility to check what the error number means), you might also need to increase the number of files MySQL is allowed to keep open. You can do this with the open_files_limit server variable in your my.cnf file.
The thread and table caches don’t really use much memory, and they are beneficial
because they conserve resources. Although creating a new thread and opening a new
file aren’t really expensive compared to other things MySQL might do, the overhead
can add up quickly under a high-concurrency workload. Caching threads and tables
can improve efficiency.

Tuesday, May 25, 2010

MYSQL : Checking and Reparing tables

If your database is MySQL, though, there's still hope. Over the course of this article, I will show you how to use MySQL's built-in crash recovery tools to check your database, and hopefully recover all the data you just lost.

Built-in tools
When it comes to repairing and checking tables, MySQL offers two options:
  1. myisamchk designed specifically to check and repair MyISAM tables (the default table type used by MySQL). This tool can scan your databases, identify problems, optimize tables for faster lookup, and optionally repair corrupted tables. The myisamchk tool is invoked from the command line.
  2. MySQL also allows you check and repair tables using SQL commands. The CHECK TABLE, REPAIR TABLE, and OPTIMIZE TABLE commands can be used on a running MySQL server and need to be entered through a MySQL client.

Most of the time, it's preferable to use myisamchk because it is significantly faster than using SQL commands.

Checking tables
If you're having trouble accessing a table, first try checking it for errors. To check a table, shut down the server and type myisamchk at the command prompt, followed by the table's file name, as shown below:
$ myisamchk /usr/local/mysql/data/phpbb/user.myi
Checking MyISAM file: /usr/local/mysql/data//user.MYI
Data records: 1153 Deleted blocks: 0
- check file-size
- check key delete-chain
- check record delete-chain
- check index reference
- check data record references index: 1
- check record links

Use the complete path to the table file instead of just the table name. Remember to include the file extension as well.

myisamchk options :
myisamchk -- fast Perform a quick check, only verifying if the table handler closed successfully
myisamchk -- medium-check Perform a faster check, by calculating a checksum for the indexes in each record and verifying that checksum against the index tree
myisamchk -- extend-check Perform a thorough check of the table, verifying the data in each record
Command line arguments for myisamchk

Repairing tables

Next, shut down the MySQL server. This is because myisamchk makes changes to the table file itself, so you don't want other users accessing or otherwise manipulating the file during the repair operation. Also advisable table physical backup of database.

Once the table file is backed up and the server down, you can run myisamchk with the --recover option, as shown below:
$ myisamchk --recover /usr/local/mysql/data/phpbb/user.myi
- recovering (with sort) MyISAM-table '/usr/local/mysql/data/phpbb/user.MYI'Data records: 1153
- Fixing index 1

The --recover option reconstructs the MySQL table index file after weeding the corrupted table of invalid or previously deleted records that could be causing a problem.

In the unlikely event that the --recover option fails, revert to the original table file and try the --safe-recover option. This is slower, because MySQL needs to scan through the records in the data file one by one and them restore the index, but it can sometimes work better than a regular repair operation.
$ myisamchk --safe-recover /usr/local/mysql/data/phpbb/user.myi
- recovering (with keycache) MyISAM-table '/usr/local/mysql/data/phpbb/user.MYI'
Data records: 4

Using CHECK TABLE and REPAIR TABLE

check and repair operations are run from a MySQL prompt, via the CHECK TABLE and REPAIR TABLE commands.

Consider the following example of running a CHECK TABLE command:
mysql> CHECK TABLE user;
+--------------+-------+----------+----------+
| Table | Op | Msg_type | Msg_text |
+--------------+-------+----------+----------+
| phpbb.user | check | status | OK |
+--------------+-------+----------+----------+
1 row in set (0.02 sec)

You can add the FAST, MEDIUM, and EXTENDED keywords to the command to obtain behavior similar to that available in myisamchk. For example:
mysql> CHECK TABLE user EXTENDED;
+--------------+-------+----------+----------+
| Table | Op | Msg_type | Msg_text |
+--------------+-------+----------+----------+
| phpbb.user| check | status | OK |
+--------------+-------+----------+----------+
1 row in set (0.02 sec)

When it comes to repairing tables, too, MySQL offers the REPAIR TABLE option, as below:
mysql> REPAIR TABLE user;
+--------------+--------+----------+----------+
| Table | Op | Msg_type | Msg_text |
+--------------+--------+----------+----------+
| phpbb.user | repair | status | OK |
+--------------+--------+----------+----------+
1 row in set (0.01 sec)

As with the myisamchk tool, the REPAIR TABLE command can take one of two additional options: QUICK, which tries a quick repair, and EXTENDED, which rebuilds the index after reading each record in the table.

An option here is to use the mysqlcheck utility, which provides a command line front end to the CHECK TABLE and REPAIR TABLE commands, allowing you to check and repair tables without first taking the server down. Everything that you can do with CHECK TABLE and REPAIR TABLE can be done with mysqlcheck, by passing appropriate command line options to the program.

Saturday, May 08, 2010

MySQL : Calculate Query Executed per second

Here is a way to calculate Query Executed per second :

time=10
begin=`mysql -e "show status" | awk '{if ($1 == "Questions") print $2}'`
sleep $time
end=`mysql -e "show status" | awk '{if ($1 == "Questions") print $2}'`
diff=`expr $end - $begin`
avg=`expr $diff / $time`
echo "$avg"

Wednesday, April 07, 2010

Problem : CTRL+S in Putty

Over the years, we all have habit of using CTRL+S every few minutes during working on a document, because we all had too much work lost from stupid errors; In the Windows world, CTRL+S is used as the Save you work.
But, this habit will be a problem on working in the Linux world.

By accident while inside a terminal window (in PUTTY) we press CTRL+S, this accidental keystroke meant we had reconnect to my Linux server, kill whatever program we were running, and then start it again.

But here is solution :

CTRL+S actually does XOFF, which means the terminal will accept key strokes but won’t show the output of anything. It will appear as if your terminal is dead when it’s really just waiting to be turned back on. The fix? Simply press CTRL+Q to turn flow-control on (XON). If you pressed a whole bunch of keys before pressing CTRL+Q, you’ll see the output from those keystrokes.

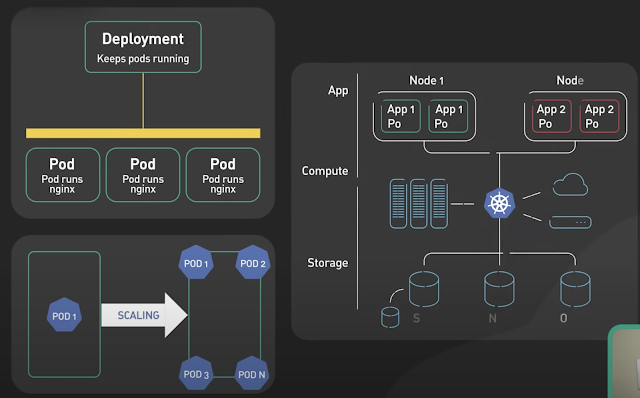
Basics of Kubernetes

 Kubernetes, often abbreviated as K8s , is an open-source platform designed to automate the deployment, scaling, and management of container...